Guest Post originally on the OverOps blog by Alex Zhitnitsky, Product Marketing Director, OverOps
A step-by-step guide for delivering more reliable software in today’s increasingly complex and fast moving environment.

This post is based on a recent webinar created in collaboration with the Cloud Native Computing Foundation, together with Brandon Groves and Ben Morrise from the OverOps engineering team.
If you think of the shift to microservices and containers as an evolution rather than a revolution then you’ve reached the right place! In this post we’ll take a pragmatic approach to the realm of Kubernetes-based applications and go over a list of steps to help ensure reliability throughout the pipeline.
Because even though ensuring application quality today is two times as difficult as it was in the past, there are also twice as many ways for us to improve it.
Specifically, we’ll touch on the 3 pillars of Continuous Reliability in the context of troubleshooting Kuberenetes-based applications: implementing code quality gates in your CI pipeline, enabling observability in CD pipelines, and creating a contextual feedback loop back to development.
The complete recording of the webinar is available right here, and we’d like to thank CNCF for hosting us on this webinar:
Outline
Phase 1: Build & Testing
- Item #1: Static Analysis
- Item #2: Unit Tests
- Item #3: Integration and End-to-end testing
Phase 2: Staging / User Acceptance Testing (UAT)
- Item #4: Performance/Scale testing
- Item #5: Staging go-no-go decision
Phase 3: Production
- Item #6: Build Rollout
- Item #7: Rollback Criteria
The State of Software Quality Today
First, let’s try to understand what changed and why the basics of code quality need to be revisited.
Just recently, we wrapped up our annual State of Software Quality survey with over 600 responses from developers all over the world. Our goal this year was to find out how today’s engineering teams are addressing the speed vs. quality dilemma.
The good news is that the majority of survey participants (70%) indicated that quality is paramount and that they would prioritize it over speed when faced with this trade-off. Unfortunately, a similar percentage of respondents are spending a day per week or more troubleshooting code-related issues and over 50% of them experience customer impacting issues at least once a month.
And while this survey was focused more broadly on the realities and challenges of delivering reliable software – 45% of respondents said that they’re adopting containers in one way or another. There’s no doubt that containerized microservices and k8s are great for delivering software at scale, BUT they also bring in new challenges that need to be addressed by taking a more structured approach to quality. Challenges such as:
- Managing the transition from a monolithic application to microservices.
- Orchestrating deployments across multiple services.
- Writing and running effective tests.
- Dealing with polyglot programming across microservices.
- Logging across microservices.
- And tracing transactions through the system.
To learn more about these challenges and others, check out our CTO’s recent post on The New Stack. So by now, how scared or confident are you when you hear kubernetes or microservices?… We hope that not too much!
It’s time to dive into our checklist.
Phase 1: Build & Testing
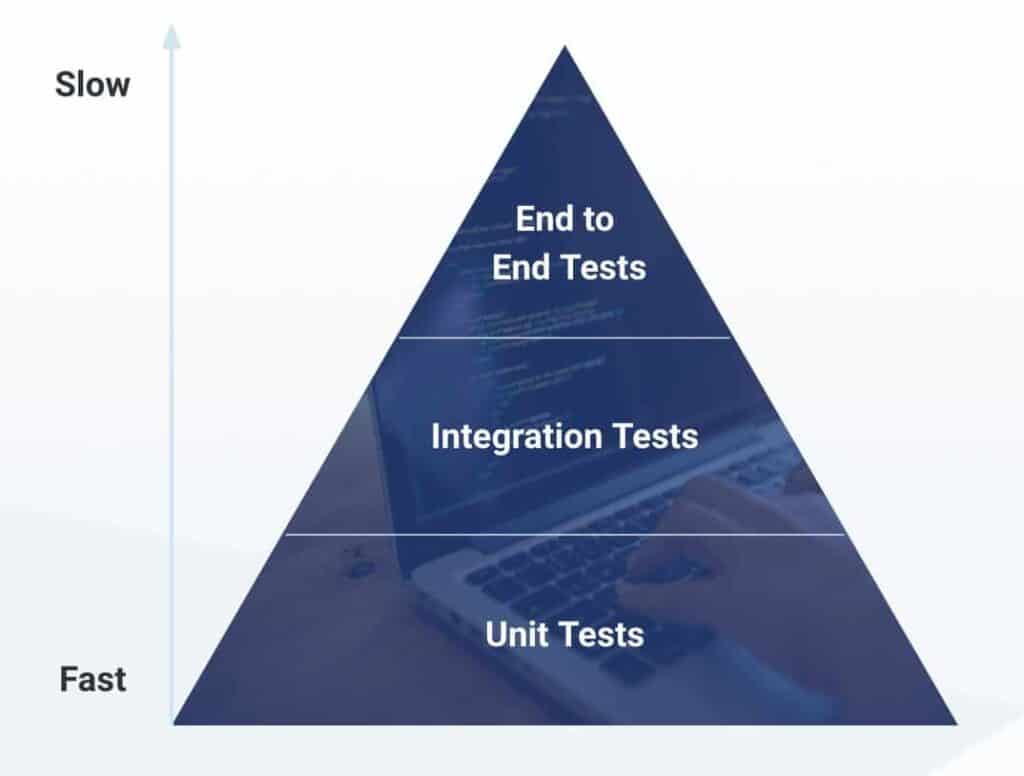
To kick this off, we thought it would make sense to start from the basics. A quick recap of Mike Cohn‘s test pyramid:

Near the bottom, we have Unit Tests which are pretty quick and “cheap” to run resource-wise but they’re also very granular, covering smaller components of your application. As we rise up in the pyramid, we’re getting into Integration Tests and End-to-End Testing which require more resources, yet cover larger areas in the application and possibly multiple microservices with more complex transactions. And that’s really the trade-off we need to think of as we get into the first phase of building & testing – how to make sure that we’re making the best use of our time to and driving the most impact?
Item #1: Static Analysis
The first thing you’ll want to look at if you’re not doing this already is incorporating a static analysis solution as part of your pipeline. As the name suggests, Static Analysis means that your code will be scanned and analyzed against a database of common bugs and security issues. While it relies on the same input that goes into your IDEs compiler, static analysis is a little more complex and takes into account issues that compilers don’t necessarily look for.
In addition, Static Analysis can act as a linting tool that will check your code for industry standards and identify “code smells” and styling issues. To learn more about Static Analysis (and how it compares with Dynamic Analysis), check out this blog post by Karthik from our team.
Item #2: Unit Tests
As you saw on the testing pyramid these are the type of tests that are pretty quick to run, since they focus on a smaller piece of code like a single class or a few methods within a class.
There are a lot of people that recommend achieving at least 80% or 90% test coverage on all of your code, but that’s not always the right thing to do. Just because you tested a bunch of getters and setters to increase your code coverage, doesn’t mean that you did good unit testing and so make sure that you’re testing the right thing at the right place.

Read our recent blog post about the reasons why testing is not sufficient.
Item #3: Integration and End-to-end testing
These tests fit at the top of the testing pyramid, covering bigger parts of the application but take up more resources both in terms of coming up with the tests and running them.
Open-source solutions to look into:
- Apache JMeter (testing functional behavior and performance),
- SonarQube (Static Analysis)
- kubectl apply validate -dry-run=client -f example.yaml (validates your YAML file)
Phase 2: Staging / User Acceptance Testing (UAT)
The goal of your staging environment is to replicate production as closely as possible, so that when you execute your performance and scale tests you can be confident that it will behave as if your new release is running in production. A simulator of sorts. For those of you who are fans of unpopular opinions read our post about why staging environments aren’t living up to their expectations.
Item #4: Performance/Scale testing
Focusing on backend applications, there are many different flavors of performance tests that you can run, some of these include::
- Load testing. Handling expected user loads, identifying where there may be potential performance bottlenecks.
- Stress testing. Handling extreme workloads, identifying your application’s “breaking point” is in terms of scale.
- Endurance testing. Handling load over a long period of time. It may perform well in the beginning but after running for some period of time you may have a performance degradation.
- Spike testing. Handling a large spike of user load in an instant.
- Volume testing. Determining if your application performs well depending on how full your database is.
- Scalability testing. Determining your applications ability to effectively scale up to support an increased user load. Helping you effectively plan for capacity additions to your system.
- Chaos engineering. Helping build confidence in the system’s capability to withstand turbulent and unexpected conditions.
Depending on your specific application and the types of issues it typically runs into, investing in at least a few types of tests from this list can make a lot of sense.
Item #5: Staging go-no-go decision
After all of that and based on the results – you’ll have to make a go-no-go decision. This is where you need to think about your risk tolerance again and define what you consider a critical issue.
To help inform this decision, using dashboards has proven to be beneficial for gathering and viewing metrics as you’re doing your builds and as you’re doing your tests. That way you can get a bird’s-eye view of all the issues that you may have and the areas you might need to improve. Not just pass/fail test results, but also also more complex indicators. To dive deeper into metrics, check out this post about the 4 types of code-level data OverOps collects.
But be careful – gathering excessive metrics and looking at too many dashboards quickly turns to a problem of its own. There’s a delicate balance between information overload and effective prioritization that engineering teams need to learn and relearn as they run through this exercise.
In addition, you’ll need to set up the basis for your rollback strategy, reverting a misinformed ‘go’ decision. What happens when you identify an issue that requires a rollback? What types of issues require a rollback and which issues can wait for the next release? Answering these questions will help lay the foundation for this strategy and it’s always better to answer these questions BEFORE going to production. Some open-source dashboards to look into include Grafana, Kibana and Prometheus.
Phase 3: Production
One of the advantages of Kubernetes is that you can have multiple teams working on different modules in your application. Those modules can be developed and deployed separately and on their own schedule or developed and deployed together, and there are multiple ways to address potential problems in this process to prevent customer impacting issues.
Which brings us to…
Item #6: Build Rollout
The default approach for Kubernetes is to do a rolling update which means that pods are incrementally updated with the new code until the rollout is complete.
Another approach is using canary deployments as a progressive delivery mechanism. Releasing an update to a small subset of users before introducing it to everyone. Some common strategies are to release these features to a random subset, a demographic subset, or possibly internal users only. While canary deployments can be done entirely inside of Kubernetes, it’s much easier to implement them with a service mesh solution like Istio that can regulate the routing. CI/CD solutions like Spinnaker offer similar canary functionality as well
A critical component of rollouts is timing – if I know that there’s a lot of traffic in the middle of the day, I probably shouldn’t be releasing at that time. It’s best to find a time that wouldn’t impact users if a downtime is going to occur. A possibility that we always try to avoid. As part of the rollout strategy, you also want to make sure that the updates are happening in the right order so that APIs aren’t suddenly breaking compatability.
Item #7: Production Feedback Loop
Most importantly – we want to make sure that all the data about the behavior of our application is easily accessible to developers. Whether that’s in testing, staging or production, this feedback loop can be implemented using a myriad of tools that provide visibility and integrate with issue tracking and incident management software. Tools that address performance monitoring, tracing and logging.
The Benefits of Continuous Reliability
In an ideal world, engineering teams who follow this checklist wouldn’t have to worry about production errors ever again. Unfortunately, the fact of the matter is that’s not really the case and companies who invest in all of the areas mentioned above still experience issues.
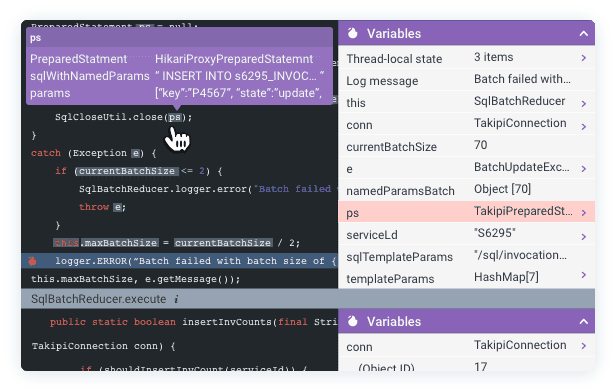
This is exactly where the vision of Continuous Reliability fits in, addressing gaps in testing, staging, and production. Continuous Reliability is enabled by a new technology for analyzing code at runtime, providing engineering teams with application error analytics that enable them to identify, prevent, and resolve critical runtime errors. In a nutshell, it let’s you single out the new and critical errors that happened while your code was being exercised by tests or running in production, and get the complete context required to fix them:

Learn more about Continuous Reliability by visiting overops.com.