


Guest post originally published on the InfraCloud blog by Nikhil Purva
As more and more organizations making the shift to cloud native technologies, Kubernetes has become the de facto choice to orchestrate container based applications. As applications grow in size, the number of microservices increases and so does the data they process. Hence, handling data, especially sensitive data becomes critical. Out of the box, Kubernetes supports ‘Secrets’ objects to store sensitive information like passwords, tokens, ssh keys, etc. securely.
Kubernetes secret eliminates the need of hard-coding sensitive data in the application code. Secrets provide this sensitive information as data mount or expose them as environment variables.
Let’s take a quick example of how this secret object is getting used within the Kubernetes cluster.
Create a secret object:
apiVersion: v1
kind: Secret
metadata:
 name: rabbitmq
 namespace: default
type: Opaque
data:
 RABBITMQ_PASSWORD: cmFiYml0bXE=
Now, let’s understand how to Inject this secret object inside a pod using an environment variable.
apiVersion: apps/v1
kind: Pod
metadata:
 name: nginx
spec:
  containers:
  - name: nginx
    image: nginx:latest
    env:
      - name: RABBITMQ_PASSWORD
        valueFrom:
          secretKeyRef:
            name: rabbitmq
            key: RABBITMQ_PASSWORD
That’s how we can easily inject a secret inside a pod and secure sensitive information. However, there is a challenge with this approach. Our sensitive information is still not fully secure because the yaml definition of secrets are base64 encoded, and anyone can easily decode base64 encoded secrets.
To overcome this challenge with managing secrets within Kubernetes cluster, we need a better secret management system that provides a single source of credentials, secrets, security policies, etc. There are many solutions already available in the open source world like Bank-Vaults, AWS Secrets Manager, and Cloud KMS, but in this article, we will be focusing on HashiCorp Vault as it is currently widely adopted within the cloud native ecosystem. In this blog post, we will discuss how you can create a production grade secret management system using Hashicorp Vault.
What is HashiCorp Vault?
HashiCorp Vault is a secret management tool that is used to store sensitive values and access it securely. A secret can be anything, such as API encryption keys, passwords, or certificates. Vault provides encryption services and supports authentication and authorization.
We can run Vault in high-availability (HA) mode and standalone mode. The standalone mode runs a single Vault server which is less secure and less resilient that is not recommended for production grade setup.
Benefit of using HashiCorp Vault in HA using Raft
Vault can run in the multi-server mode for high availability to protect against outages. To persist the encrypted data, Vault supports many storage backends like Consul, MySQL, DynamoDB, etc.
But there are some challenges using these standard backend storages like:
- Increased complexity with addition of storage backends.
- Additional configuration needed to allow Vault to operate as a client.
- Vault configuration to connect to the provider as a client.
So we need a solution which minimizes these challenges and at the same time, allows us to implement and manage security efficiently.
In this article we are focusing on Integrated storage to persist the data which has below benefits:
- Integrated into Vault (reducing the total administration).
- All configuration stays within Vault.
- Supports failover and multi-cluster replication.
- Get rid of additional network requests to backe.
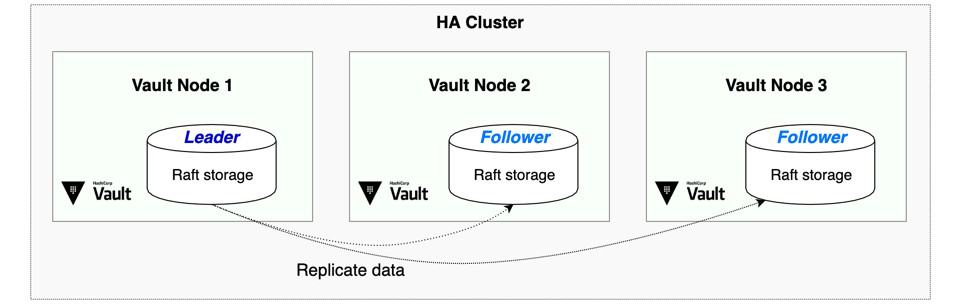
In a Kubernetes cluster, to deploy Vault in high availability mode, it would be deployed as a cluster of pods. When deploying Vault in HA mode, all the nodes in a Vault cluster will have a replicated copy of Vault’s data. Under the hood, Raft Consensus Algorithm is used to replicate the data across all the nodes.
Deploy Vault in HA and Vault Auto Unseal
Before we jump into deploying Vault, it is important to understand what happens when we deploy a Vault pod. After deployment, the Vault pods start in a sealed state. That means until we unseal the Vault server, almost no operations are allowed. Here, unsealing is the process of decrypting the data inside Vault and allowing other services to access it.
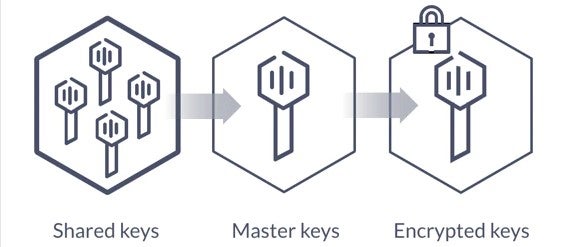
The data that is generally stored in Vault is encrypted and it needs an encryption key to decrypt the data. As we see in the below diagram, to decrypt the data, Vault must decrypt the encryption key first, which requires the master key. Unsealing is the process of getting access to this master key. The master key is also stored alongside all other Vault data, but it is encrypted by another mechanism: the unseal key. By default the Vault config uses Shamir seals.
Vault Auto Unseal
To make the Vault server secure, there is also an API that seals it. This process puts away the master key in memory and requires another unseal process to restore it. So in case a pod gets restarted, every time someone has to manually unseal the Vault using vault operator unseal command.
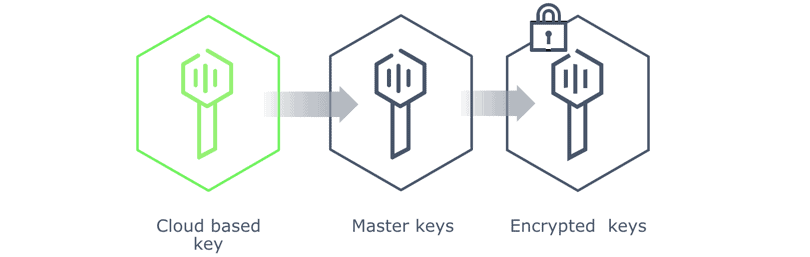
To avoid the manual step of unsealing, Vault supports automatic unsealing via cloud based key management services like Azure Key Vault, Amazon KMS, AliCloud KMS, and Google Cloud KMS which enables us to let trusted cloud providers take care of the unsealing process, as seen in the below diagram.
We are going to set up an auto-unsealing Vault on Kubernetes with Azure Key Vault. Let’s start by setting up the required Azure Services:
Prerequisite: You need to have an Azure cloud account. If not, you can create trial account for free.
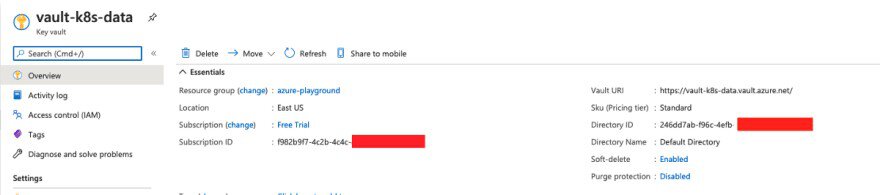
- Create an Azure Key Vault by following official documentation and note down the Subscription ID and Directory ID, which will be required in later steps.
- Next step is to register an App by following official documentation which establishes a trust relationship between our app and the Microsoft identity platform. This trust is unidirectional: your app trusts the Microsoft identity platform, and not the other way around. Here we will create a Service Principal which will work as our access layer to the Azure Key Vault.
It is very important to copy the value of Application (client ID) and client secret from register an App section mentioned above.
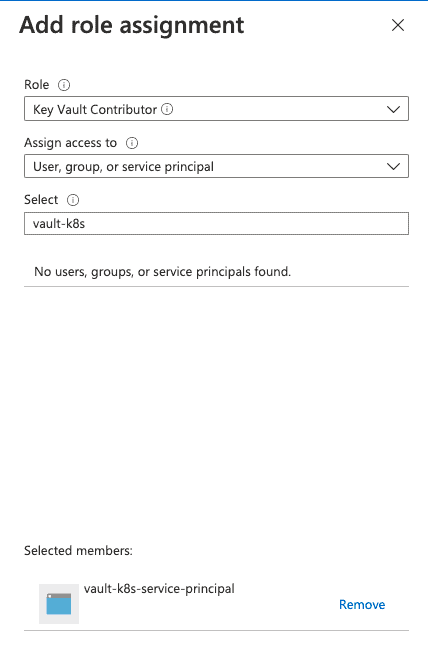
- Once this is done, let’s switch back to Azure Key Vault, and under IAM add a new Role Assignment as Key Vault Contributor for our newly created Service Principal:
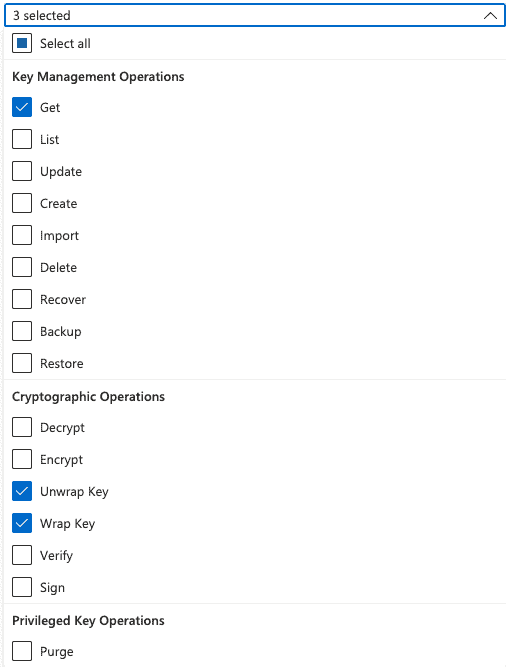
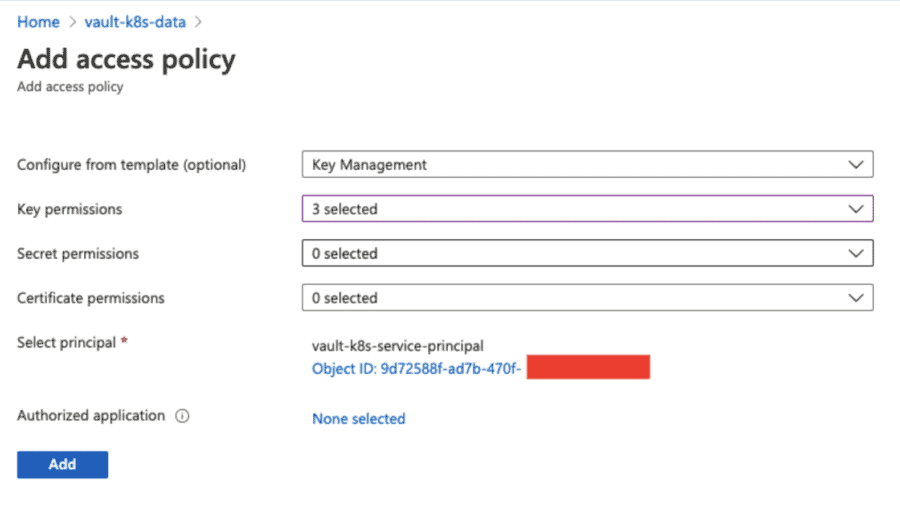
- Once the Service Principal is assigned to the Azure Key Vault, we need to provide specific access permissions to it. Vault needs Get permissions at key level and Unwrap Key and Wrap Key at Cryptographic level, so under access policy, create a new one with those selected:
- Select the Service Principal in the list, Click on Add and Save the configuration
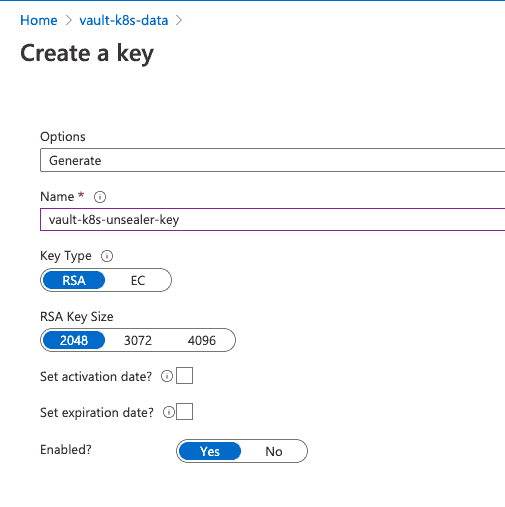
- The last step on Azure portal is to create a key on Key Vault, which will be the unsealing key for Vault:
Once the above steps are done, it’s time to install the HashiCorp Vault. The recommended way to deploy a Vault in the Kubernetes cluster is using the Vault’s official Helm chart. To deploy Vault in HA with auto unsealing use the below-mentioned values.yml file.
injector:
  enabled: false
server:
  image:
    repository: "hashicorp/vault"
    tag: "1.9.0"
    # Overrides the default Image Pull Policy
    pullPolicy: IfNotPresent

  # Configure the Update Strategy Type for the StatefulSet
  updateStrategyType: "OnDelete"
  resources:
    requests:
      memory: 256Mi
      cpu: 250m
    limits:
      memory: 256Mi
      cpu: 250m
  ha:
    enabled: true
    replicas: 3
    raft:
      enabled: true
      config: |
        ui = true
        listener "tcp" {
          tls_disable = 1
          address = "[::]:8200"
          cluster_address = "[::]:8201"
        }
        seal "azurekeyvault" {
          tenant_id       = "0fd16XXX-xxxx-xxxx-xxxx-xxxx"
          client_id       = "ab509eca-xxxx-xxxx-xxxx-xxxxxxxxxxxx"
          client_secret   = "UTb7Q~xxxxxxxxxxxxxxxxxxxxxxxxxxxxxxxx"
          vault_name      = "vault-k8s-data"
          key_name        = "vault-k8s-unsealer-key"
          subscription_id = "c83a96b1-xxxx-xxxx-xxxx-xxxxxxxxxxxx"
        }
        storage "raft" {
          path = "/vault/data"
        }
        service_registration "kubernetes" {}
  dataStorage:
    enabled: true
    size: 500Mi
The values mentioned under seal “azurekeyvault” in the above configuration are derived from Azure portal while setting up azure services.
Note:
| Config | Description |
|---|---|
tenant_id | Key Vault’s Directory ID |
client_id | Service Principal’s Application ID |
client_secret | Service Principal’s generated secret (the one that is not retrievable) |
vault_name | Name of Azure Key Vault instance |
key_name | Name of generated key on Azure Key Vault |
subscription_id | ID of the Azure Subscription |
Proceed with the installation following the steps mentioned below:
$ helm repo add hashicorp https://helm.releases.hashicorp.com
"hashicorp" has been added to your repositories

$ helm install vault hashicorp/vault -f values.yaml
NAME: vault
LAST DEPLOYED: Sat Mar  5 22:14:51 2022
NAMESPACE: default
STATUS: deployed
REVISION: 1
NOTES:
Thank you for installing HashiCorp Vault!

Now that you have deployed Vault, you should look over the docs on using
Vault with Kubernetes available here:

https://www.vaultproject.io/docs/


Your release is named vault. To learn more about the release, try:

$ helm status vault
$ helm get manifest vault
Let’s verify the installation by running below-mentioned command:
$ kubectl get pods -n vault
NAME                                           READY   STATUS    RESTARTS
vault-0                                        0/1     Running   0
vault-1                                        0/1     Running   0
vault-2                                        0/1     Running   0
As discussed earlier, Vault starts in a sealed state, and that’s why all the Vault pods are in running status but none of the Vault pods are “ready”. To unseal Vault, we need to initialize it. Just exec into pod vault-0 and initialize your Vault instance (and keep your generated keys safe) as shown below:
$ kubectl exec -it vault-0 vault operator init

Recovery Key 1: FKjt5wkzN5bUBIuR52KrPP1c2Il/f7RZdn5E+ipfNF8s
Recovery Key 2: FCzUyduESPyavh6QtqWZpdnUDKa3bEEpBHbX3NgTrCiU
Recovery Key 3: Tf7FVEpj5tdJLqQqNw/Jt0OytRI5FAZYig/yafSVz3Xg
Recovery Key 4: duLpa/6IozTOR0mkO7sp0CwmnI+1DsC6d2+oZG/A1CIZ
Recovery Key 5: pyVFs/rRFEk9rSn57Ru+KeuAQzW6eurl3j0/pS/JRpXD
Initial Root Token: s.d0LAlSnAerb4a7d6ibkfxrZy
Success! Vault is initialized
Recovery key initialized with 5 key shares and a key threshold of 3. Please
securely distribute the key shares printed above.
Now, we see the Vault unsealer in action:
$ kubectl get pods -n vault
NAME                                           READY   STATUS    RESTARTS
vault-0                                        1/1     Running   0
vault-1                                        0/1     Running   0
vault-2                                        0/1     Running   0
However, our replica vault-1 and vault-2 are still not ready. They are follower pods of the leader vault-0. In order to make vault-0 visible, we need to login using our Initial Root Token.
$ kubectl exec -it vault-0 -- vault login s.d0LAlSnAerb4a7d6ibkfxrZy

Success! You are now authenticated. The token information displayed below
is already stored in the token helper. You do NOT need to run "vault login"
again. Future Vault requests will automatically use this token.
Key                  Value
---                  -----
token                s.d0LAlSnAerb4a7d6ibkfxrZy
token_accessor       hJEFibLTbUP4sgA8X4tMBqZ8
token_duration       ∞
token_renewable      false
token_policies       ["root"]
identity_policies    []
policies             ["root"]
Next, let’s join vault-1 and vault-2 to Vault-0 to make the Vault setup Highly available by running commands as shown below:
$ kubectl exec -it vault-1 -- vault operator raft join http://vault-0.vault-internal:8200

Key       Value
---       -----
Joined    true

$ kubectl exec -it vault-2 -- vault operator raft join http://vault-0.vault-internal:8200

Key       Value
---       -----
Joined    true
Let’s check the pod status and this time you would be able to see them in running as well as Ready mode:
$ kubectl get pods -n vault
NAME                                           READY   STATUS    RESTARTS
vault-0                                        1/1     Running   0
vault-1                                        1/1     Running   0
vault-2                                        1/1     Running   0
The last but important step is to verify whether the HA setup is correct or not, is by running the below command against each Vault pod and making sure that the value of HA Enabled parameters is true.
$ kubectl exec -it -n vault vault-0 -- vault status
Key                      Value
---                      -----
Recovery Seal Type       shamir
Initialized              true
Sealed                   false
Total Recovery Shares    5
Threshold                3
Version                  1.9.0
Storage Type             raft
Cluster Name             vault-cluster-30882e80
Cluster ID               1afbe13a-e951-482d-266b-e31693d17e20
HA Enabled               true
HA Cluster               https://vault-0.vault-internal:8201
HA Mode                  active
Active Since             2022-01-19T04:39:37.586622342Z
Raft Committed Index     61
Raft Applied Index       61

$ kubectl exec -it -n vault vault-1 -- vault status
Key                      Value
---                      -----
…
HA Enabled               true
HA Cluster               https://vault-0.vault-internal:8201
HA Mode                  standby
Active Node Address      http://10.244.0.17:8200
Raft Committed Index     61
Raft Applied Index       61

$ kubectl exec -it -n vault vault-2 -- vault status
Key                      Value
---                      -----
HA Enabled               true
HA Cluster               https://vault-0.vault-internal:8201
HA Mode                  standby
Active Node Address      http://10.244.0.17:8200
Raft Committed Index     61
Raft Applied Index       61
As you can see vault-0 is active and vault-1 and vault-2 is standby. Now, Let’s try deleting vault-0 and run the same command, you will notice that vault-1 has become active and vault-0 becomes standby.
kubectl -n vault delete pod vault-0
$ kubectl exec -it -n vault vault-1 -- vault status
Key                      Value
---                      -----
…
HA Enabled               true
HA Cluster               https://vault-1.vault-internal:8201
HA Mode                  active
Active Node Address      http://10.244.0.18:8200
Raft Committed Index     61
Raft Applied Index       61

$ kubectl exec -it -n vault vault-0 -- vault status
Key                      Value
---                      -----
…
HA Enabled               true
HA Cluster               https://vault-1.vault-internal:8201
HA Mode                  standby
Active Since             2022-01-19T04:39:37.586622342Z
Raft Committed Index     61
Raft Applied Index       61
Vault Web UI
Finally to be able to access the Vault web interface; let’s port-forward the service.
$ kubectl port-forward -n vault svc/vault 8200:8200`
Vault UI will be accessible on http://localhost:8200
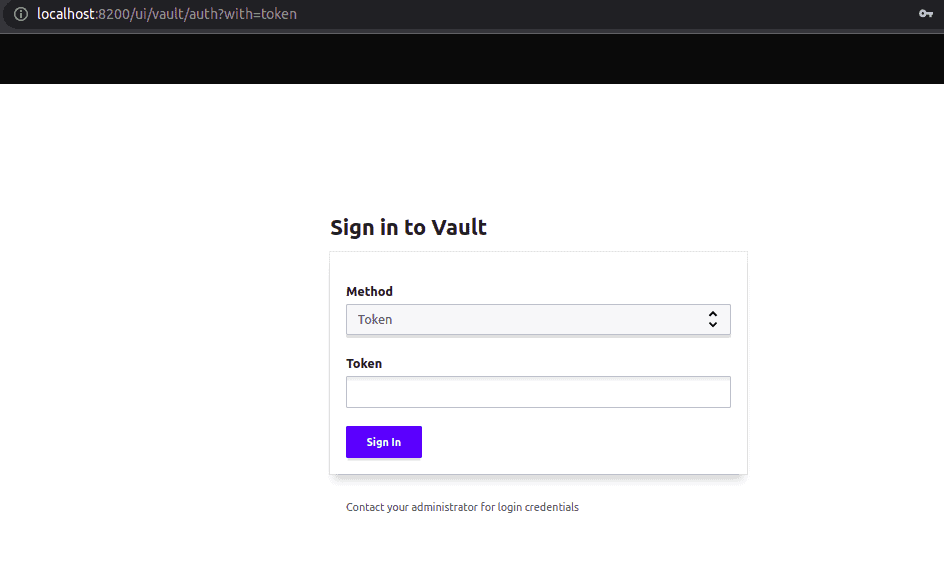
To login in Vault, enter the token that we generated when we initialized Vault for the first time (Initial Root Token).
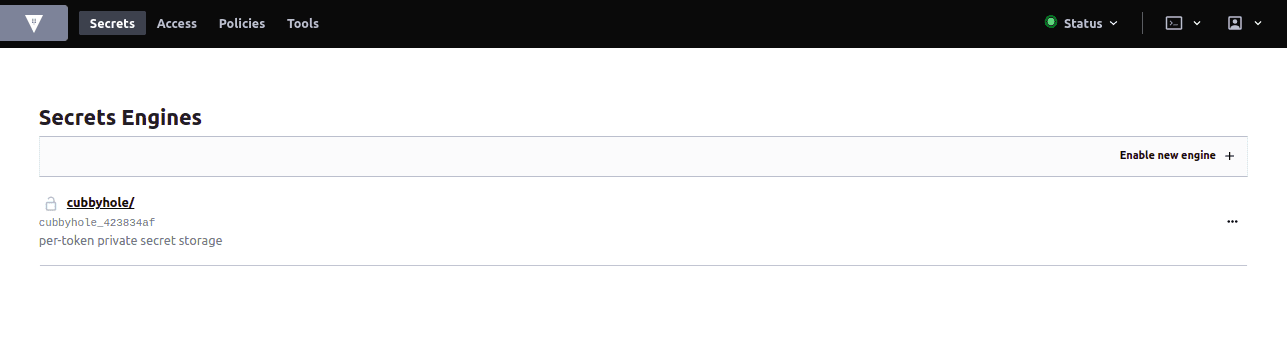
Secrets Engine is a Vault component that stores or generates a secret. Vault supports different types of Secrets Engines like key-value, ssh keys, certificates, etc.
To start with, let’s use a KV secrets engine, click on the Enable New Engine+ button, select the KV engine and click on Next.
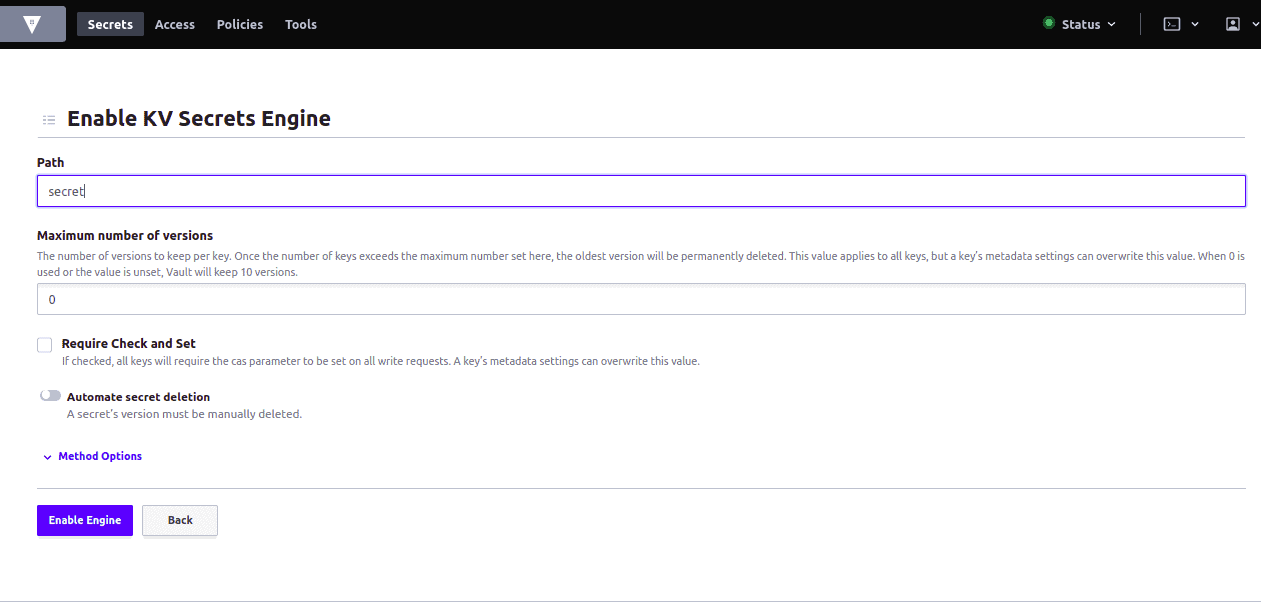
Give a path name and click on Enable Engine.
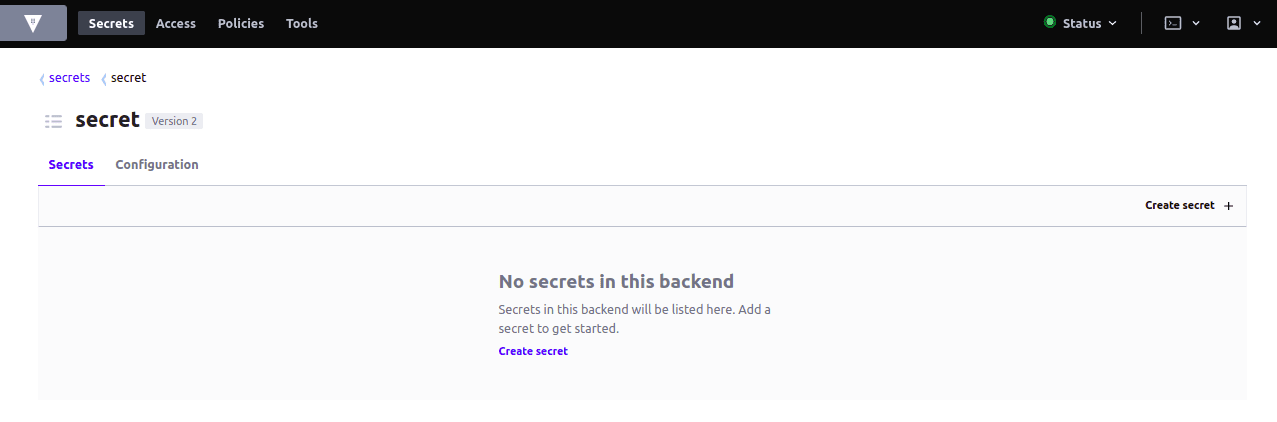
Now, let’s create a secret, click on Create secret and enter the details as shown in the below figure.
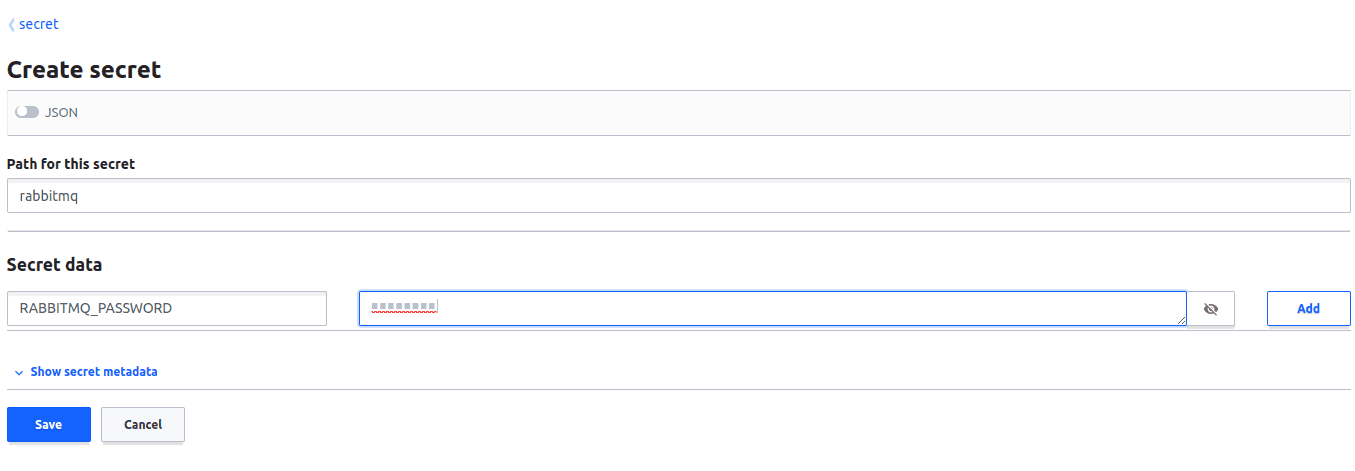
Once we click on save, we should be able to see that the secret has been successfully created and stored in a Vault.
Since Vault centrally stores, secures and controls access to the secrets, it is important to control the permissions before anyone can gain access. Vault supports Role Based Access Control to limit the access. Refer to the official Vault documentation on policies to understand more about the policies and roles.
Until this point, we have successfully deployed Vault in HA using Helm, learnt about configuring role based access and created a secret object. Let’s now inject this secret inside a pod.
Inject Vault secrets into pod
Since Vault has been deployed successfully let’s now jump into injecting the Vault secrets into the pods/application. Mainly there are two ways for a pod to use Secret object:
- As a file mounted in volume.
- As a container environment variable. Secrets can be injected into the application with the Vault agent and this introduces a new requirement that deployments install and configure Vault Agent alongside the application as a sidecar.
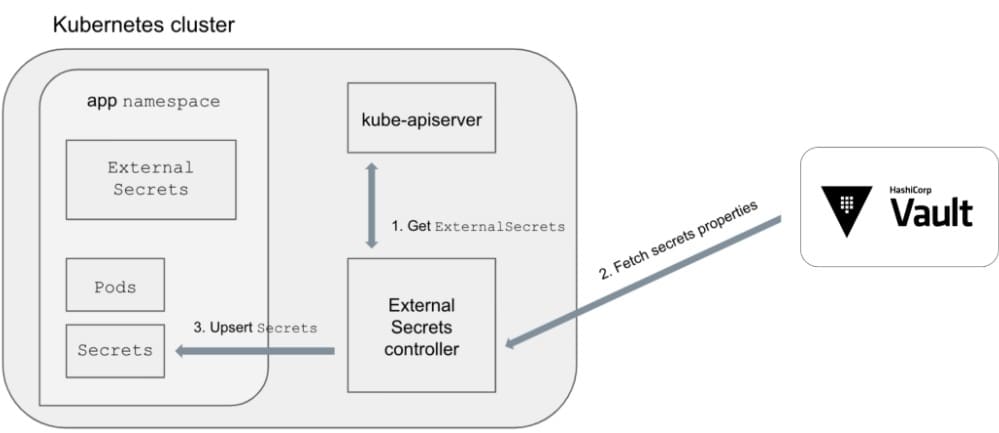
Now, we will be focusing on injecting a Vault secret into an application using External Secrets. The benefit of Kubernetes External Secrets is that it can be used with Vault, external secret management systems like AWS Secret Manager, Azure Key Vault to securely add secrets. Kubernetes External Secrets extends the Kubernetes API by adding an ExternalSecrets object using Custom Resource Definition.
An ExternalSecret object declares how to fetch the secret data, while the controller converts all ExternalSecrets to Secrets.
Just like the Hashicorp Vault, the recommended way to deploy Kubernetes-External-Secrets is using the official helm chart and use the below-mentioned values.yaml file.
env:
  VAULT_ADDR: http://vault:8200
  METRICS_PORT: 3001
  POLLER_INTERVAL_MILLISECONDS: 10000
  WATCH_TIMEOUT: 60000
  WATCHED_NAMESPACES: ""  # Comma separated list of namespaces, empty or unset means ALL namespaces.
  LOG_LEVEL: info
  LOG_MESSAGE_KEY: "msg"
rbac:
  # Specifies whether RBAC resources should be created
  create: true

serviceAccount:
  # Specifies whether a service account should be created
  create: true
  # Specifies annotations for this service account
  annotations: {}
  # The name of the service account to use.
  # If not set and create is true, a name is generated using the fullname template
  name: kubernetes-external-secrets
replicaCount: 1
image:
  repository: ghcr.io/external-secrets/kubernetes-external-secrets
  tag: 8.5.1
  pullPolicy: IfNotPresent
resources: {}
Run the following command to deploy the external secrets.
$ helm repo add external-secrets
https://external-secrets.github.io/kubernetes-external-secrets/
"external-secrets" has been added to your repositories

$ helm install k8s-external-secrets external-secrets/kubernetes-external-secrets -f values.yaml
NAME: k8s-external-secrets
LAST DEPLOYED: Wed Mar 23 22:50:35 2022
NAMESPACE: default
STATUS: deployed
REVISION: 1
TEST SUITE: None
NOTES:
The kubernetes external secrets has been installed. Check its status by running:
$ kubectl --namespace default get pods -l "app.kubernetes.io/name=kubernetes-external-secrets,app.kubernetes.io/instance=k8s-external-secrets"

Visit https://github.com/external-secrets/kubernetes-external-secrets for instructions on how to use kubernetes external secrets
At this point, the kubernetes-external-secret has been deployed successfully and with the help of the ExternalSecrets object, now we can inject secrets inside the pods that are stored in Vault.
But the external-secrets controller needs to be authenticated with Vault before making any request to retrieve the secrets, so we need to enable the Kubernetes authentication method and attach a policy to it.
Enable Kubernetes Auth Method
Let’s access the Vault pod’s terminal and enable kubernetes auth method:
$ kubectl exec -it vault-0 sh
$ vault login s.d0LAlSnAerb4a7d6ibkfxrZy
$ vault auth enable kubernetes

Success! Enabled kubernetes auth method at: kubernetes/
The Kubernetes Auth Method can be used to authenticate with Vault using Kubernetes Service Account Token, as Vault accepts this token by any client within the Kubernetes cluster.
Configure the kubernetes authentication method by running below command from inside the active Vault pod:
$ vault write auth/kubernetes/config \
    token_reviewer_jwt="$(cat /var/run/secrets/kubernetes.io/serviceaccount/token)" \
    kubernetes_host=https://${KUBERNETES_PORT_443_TCP_ADDR}:443 \
    kubernetes_ca_cert=@/var/run/secrets/kubernetes.io/serviceaccount/ca.crt

Success! Data written to: auth/kubernetes/config
The token_reviewer_jwt and kubernetes_ca_cert are created for a pod by Kubernetes when it is started. The env variable KUBERNETES_PORT_443_TCP_ADDR is defined and references the internal Kubernetes API Server network address. When an application tries to authenticate with Vault using its Service Account Token, Vault uses the above configuration to verify the client application’s identity with Kubernetes API Server.
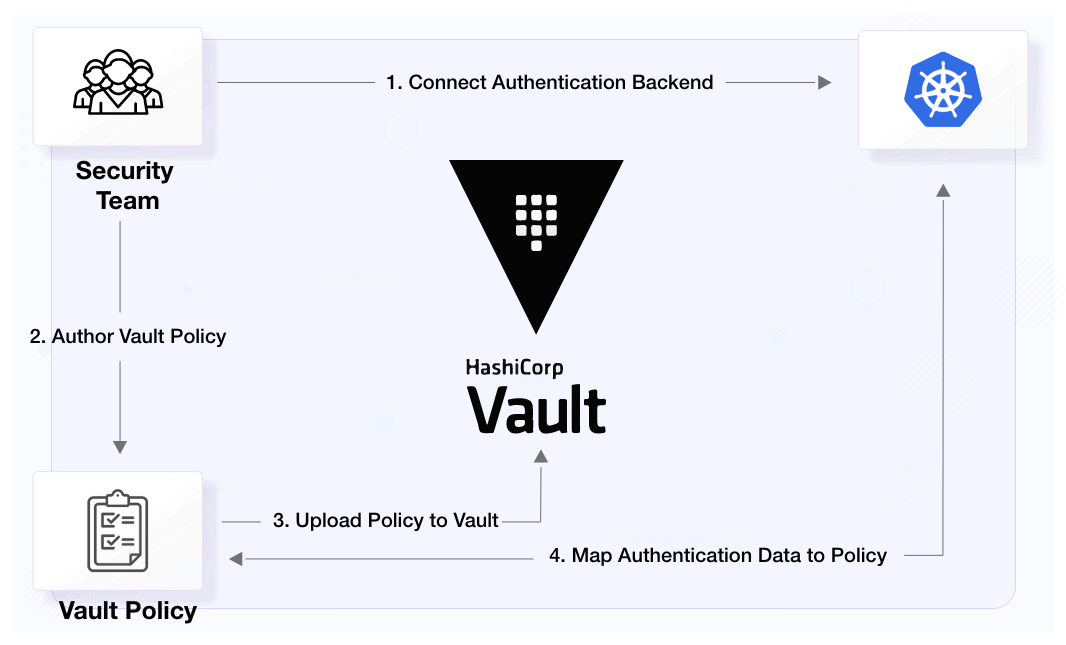
Attach a policy to Kubernetes auth method
Since we have already created a readonly policy, let’s create a role for kubernetes and attach this policy. In the below mentioned role all the service accounts in any namespaces are allowed to authenticate. We can also limit authentication to specific service accounts and namespaces as well.
$ vault write auth/kubernetes/role/k8s-role \
    bound_service_account_names=* \
    bound_service_account_namespaces=* \
    policies=readonly \
    ttl=1h

Success! Data written to: auth/kubernetes/role/k8s-role
Let’s now inject vault secrets inside a pod. We will be using the same example which we used at the start of this blog post. As discussed earlier, we just need to create an ExternalSecret object and the controller will convert it to a Secret object. Delete the secret object we created earlier and apply the below file.
apiVersion: 'kubernetes-client.io/v1'
kind: ExternalSecret
metadata:
 name: rabbitmq
 namespace: default
spec:
 kvVersion: 1
 backendType: vault
 vaultMountPoint: kubernetes
 vaultRole: k8s-role
 data:
 - name: RABBITMQ_USERNAME
   key: secret/Rabbitmq
   property: username
Save this file by name rabbitmq-external-secret.yaml and run:
$ kubectl delete secret rabbitmq
secret "rabbitmq" deleted

$ kubectl apply -f rabbitmq-external-secret.yaml
Let’s run the below command to check the status of external-secret.
$ kubectl get externalsecrets.kubernetes-client.io
NAME       LAST SYNC   STATUS    AGE
rabbitmq   10s         SUCCESS   15s

$ kubectl get secrets
NAME       TYPE     DATA    AGE
rabbitmq   Opaque   1       15s
So here, External Secret has been created successfully and the External Secrets fetched the correct value from Vault, and created the Secret object for us. This Secret object is used by our application as we saw in the beginning of the post.
Summary
Since Kubernetes is widely used and to make a Kubernetes cluster production-grade, it is very important to make sure the secret objects are handled carefully. In this article, we learned why it is important not to use native secret objects due to their limitations and the importance of using a secret management tool like HashiCorp Vault.
We also learned about External Secrets, which help us to inject secrets inside a pod. With the help of external secrets, we can easily replace the Kubernetes secrets with Vault secrets inside any existing deployments.
That’s it, folks !! I hope this article was informative and engaging. I am looking forward to hearing your thoughts on this post, so let’s connect and start a conversation on LinkedIn.
Looking for help with cloud native security? do check out our capabilities how we’re helping startups & enterprises as an DevSecOps consulting services provider.