


Member post originally published on Devtron’s blog by Abhinav Dubey
TL;DR: The blog talks about how ephemeral environments with Devtron become much easier, reducing the complexities, automating the process, and optimizing infra cost.
In the world of software development, ephemeral environments are temporary setups that serve specific purposes, such as testing or staging new features. These environments are short-lived, designed to exist only for the duration of their use case—like testing a feature branch—before being dismantled.
Ephemeral environments contrast with traditional static environments, which are permanent and can lead to inefficiencies, especially when underutilized. They offer a dynamic approach, allowing developers to create an isolated environment on demand without affecting the main codebase or other ongoing development activities.
The Technical and Business Value of Ephemeral Environments
Ephemeral environments provide significant advantages in different sectors as mentioned below:
- Cost Efficiency: By creating environments only when needed and tearing them down afterward, organizations avoid the cost of maintaining idle resources. This is particularly beneficial for companies where lower-end environments such as
dev-env, andnon-prodcan cost up to five times more than production environments. - Agility and Speed: Developers can quickly spin up environments to test new features or bug fixes without waiting for access to a shared environment. This agility accelerates development cycles and time-to-market.
- Risk Reduction: Testing in isolated environments ensures that unstable code does not affect the rest of the system, reducing the risk of bugs in production.
Is an Ephemeral Environment Right for You?
Deciding whether ephemeral environments are suitable for your organization involves considering your development needs and organizational goals. Key questions include:
- Do your development teams frequently need isolated environments for testing?
- Are you looking to optimize costs associated with non-production environments?
- Is there a need to increase deployment speed and reduce risk in production?
If you answered “yes” to any of these, ephemeral environments could be highly beneficial for you.
Keep reading
- Master DevSecOps with Devtron
- Try canary deployments with Flagger and Istio
- Pick the right auto scaling tool
- Register for KubeCon + CloudNativeCon North America 2024 today
Traditional Approach to Ephemeral Environment
Ephemeral environment as mentioned above are the short lived environments, created and destroyed once the task is completed. We can create our scripts maybe in Terraform or Ansible or in python/shell to spin up a complete new environment that can be your VM Machines or Kubernetes clusters. Even though the automation can be achieved, there are few disadvantages associated with this approach, that include:
- Delay in Releases: The time taken to bring up the entire infrastructure can lead to delays in testing features or conducting sanity checks for bug fixes, resulting in a longer time to market.
- High Complexity: Creating and maintaining scripts to standardize environments across different stages can be complex and error-prone
- Manual Interventions: Even with automation scripts, manual interventions are often required to configure and install dependencies based on the application’s specific requirements, adding to the setup time.
- DevOps Dependencies: Developers typically lack expertise in tools like Terraform or Ansible, making them dependent on DevOps or SRE teams to make changes and install dependencies for their applications, which can slow down the development process.
- Resource Management: Managing the lifecycle of ephemeral environments can be challenging. These environments need to be deleted once tasks are completed; otherwise, they lead to resource wastage and increased costs.
- High Infra Cost: The costs associated with spinning up and maintaining ephemeral environments, particularly in cloud-based setups, can add significantly to the overall infrastructure expenses.
Rethinking Ephemeral Environments
When we talk in terms of Kubernetes, setting up Ephemeral Environments becomes a lot easier than the traditional approach. Kubernetes has a beautiful thing called namespaces, a logical separation of group of resources, providing isolation of workloads within the same cluster.
By leveraging namespaces and some advanced autoscaling methods, it becomes much more easier to create a ephemeral environment that is cost-effective, less complex and helps you dynamically bring up the resources and hibernate when not in use.
How to Set Up an Ephemeral Environment in K8s Manually?
Setting up an ephemeral environment, especially within a Kubernetes ecosystem, involves several key steps that ensure agility, efficiency, and cost-effectiveness. Below, we detail a straightforward approach to creating and managing these temporary environments.
Step 1: Define Your Infrastructure Requirements
Before you create an ephemeral environment, it’s essential to understand the specific requirements of the application or feature being tested. This includes the necessary computing resources, the required services, and any dependencies that need to be replicated from the production environment.
Step 2: Automate the Environment Setup
Automation is crucial in managing ephemeral environments to ensure they can be spun up and torn down efficiently. Tools like Terraform or Ansible can be used to script the creation of your infrastructure. In Kubernetes, you might automate setting up namespaces, deploying container images, and configuring network policies through CI/CD pipelines.
Using Kubernetes Namespaces
In Kubernetes, namespaces provide a way to divide cluster resources between multiple users. Each ephemeral environment can be created in its namespace, isolating its running processes and resources from other environments
kubectl create namespace your-environment-name
Step 3: Deploy Your Application
Once the namespace is ready, deploy your application using Kubernetes manifests or Helm charts. This step often involves setting up the necessary config maps and secrets to configure the application according to the environment
kubectl apply -f your-application-deployment.yaml -n your-environment-name
Or using Helm
helm install your-application-release your-helm-chart/ -n your-environment-name
Step 4: Configure Autoscaling and Monitoring
To optimize costs and resource usage, configure autoscaling for your application workloads. Kubernetes Horizontal Pod Autoscaler (HPA) or a more advanced tool like KEDA can be used to automatically adjust the number of pods based on traffic or other metrics
apiVersion: autoscaling/v2beta2
kind: HorizontalPodAutoscaler
metadata:
  name: your-application-hpa
  namespace: your-environment-name
spec:
  scaleTargetRef:
    apiVersion: apps/v1
    kind: Deployment
    name: your-application-deployment
  minReplicas: 1
  maxReplicas: 10
  metrics:
  - type: Resource
    resource:
      name: cpu
      target:
        type: Utilization
        averageUtilization: 50
Monitoring is also essential to track the performance and health of your temporary environment. Tools like Prometheus for monitoring and Grafana for visualization can be integrated to monitor the environment’s metrics.
Step 5: Implement Cleanup Procedures
To ensure that resources are not wasted, set up automatic cleanup procedures to tear down the environment after use. This can be scheduled using cron jobs or integrated into your CI/CD pipeline to destroy the environment once the testing is complete:
kubectl delete namespace your-environment-name
Or a more controlled cleanup with Helm
helm uninstall your-application-release -n your-environment-name
Step 6: Documentation and Training
Finally, document the entire process and provide training for your teams. This ensures that everyone understands how to efficiently use ephemeral environments, which helps in maximizing the benefits while minimizing potential disruptions or misuse.
Manually creating and deleting the namespaces, and integrating it within pipelines can be something a big pain when it comes to developer productivity. Integrating different tools such as Grafana, Prometheus, Jenkins, ArgoCD, KEDA, etc can be a tedius task for DevOps / SRE engineers as well. With the the involvement of custom scripting, again the complexities increases, high rish to human errors. With Devtron’s simplified workflow, it becomes a lot more easier to automate the process, and improve the developer productivity while reducing its high dependencies from DevOps/ SRE teams.
How Devtron Simplifies Ephemeral Environments?
Devtron enhances the management of ephemeral environments through its modern dashboard, simplified workflows, automation and effective cost-management strategies. Here are key features:
- Namespace Utilization: In Kubernetes, namespaces provide logical separation, allowing multiple ephemeral environments within the same cluster without additional cost. Devtron leverages this to minimize the overhead associated with setting up and tearing down environments.
- Cost Management: Devtron implements strategies such as leveraging spot instances and right-sizing resources, ensuring that the infrastructure costs are kept to a minimum. For example, by using spot instances, organizations can save up to 70-90% compared to standard costs.
- Automated Scaling: Devtron employs tools like KEDA for event-driven autoscaling, ensuring resources are used efficiently. Environments can scale down automatically during inactivity and scale up when needed, further optimizing costs.
- Simplified Workflow: Devtron provides an intuitive dashboard for all operating on Kubernetes, providing Kubernetes-native CI/CD pipelines, simplifying the heavy scripting and stitching up of different tools to complete an end-to-end workflow.
Along with that, there are many other factors which makes the entire process much more seamless, such as visibility of workloads, application metrics, configurations management, etc.
Setting-up Ephemeral Environments With Devtron
Devtron is a Software Distribution Platform designed for Kubernetes. On its mission to democratize Kubernetes, ephemeral environments are one among the many other features, that make life easier. With Devtron’s intuitive dashboard, operations on Kubernetes become flawless, and it goes with ephemeral environments as well. To get started with ephemeral environment, follow the below steps.
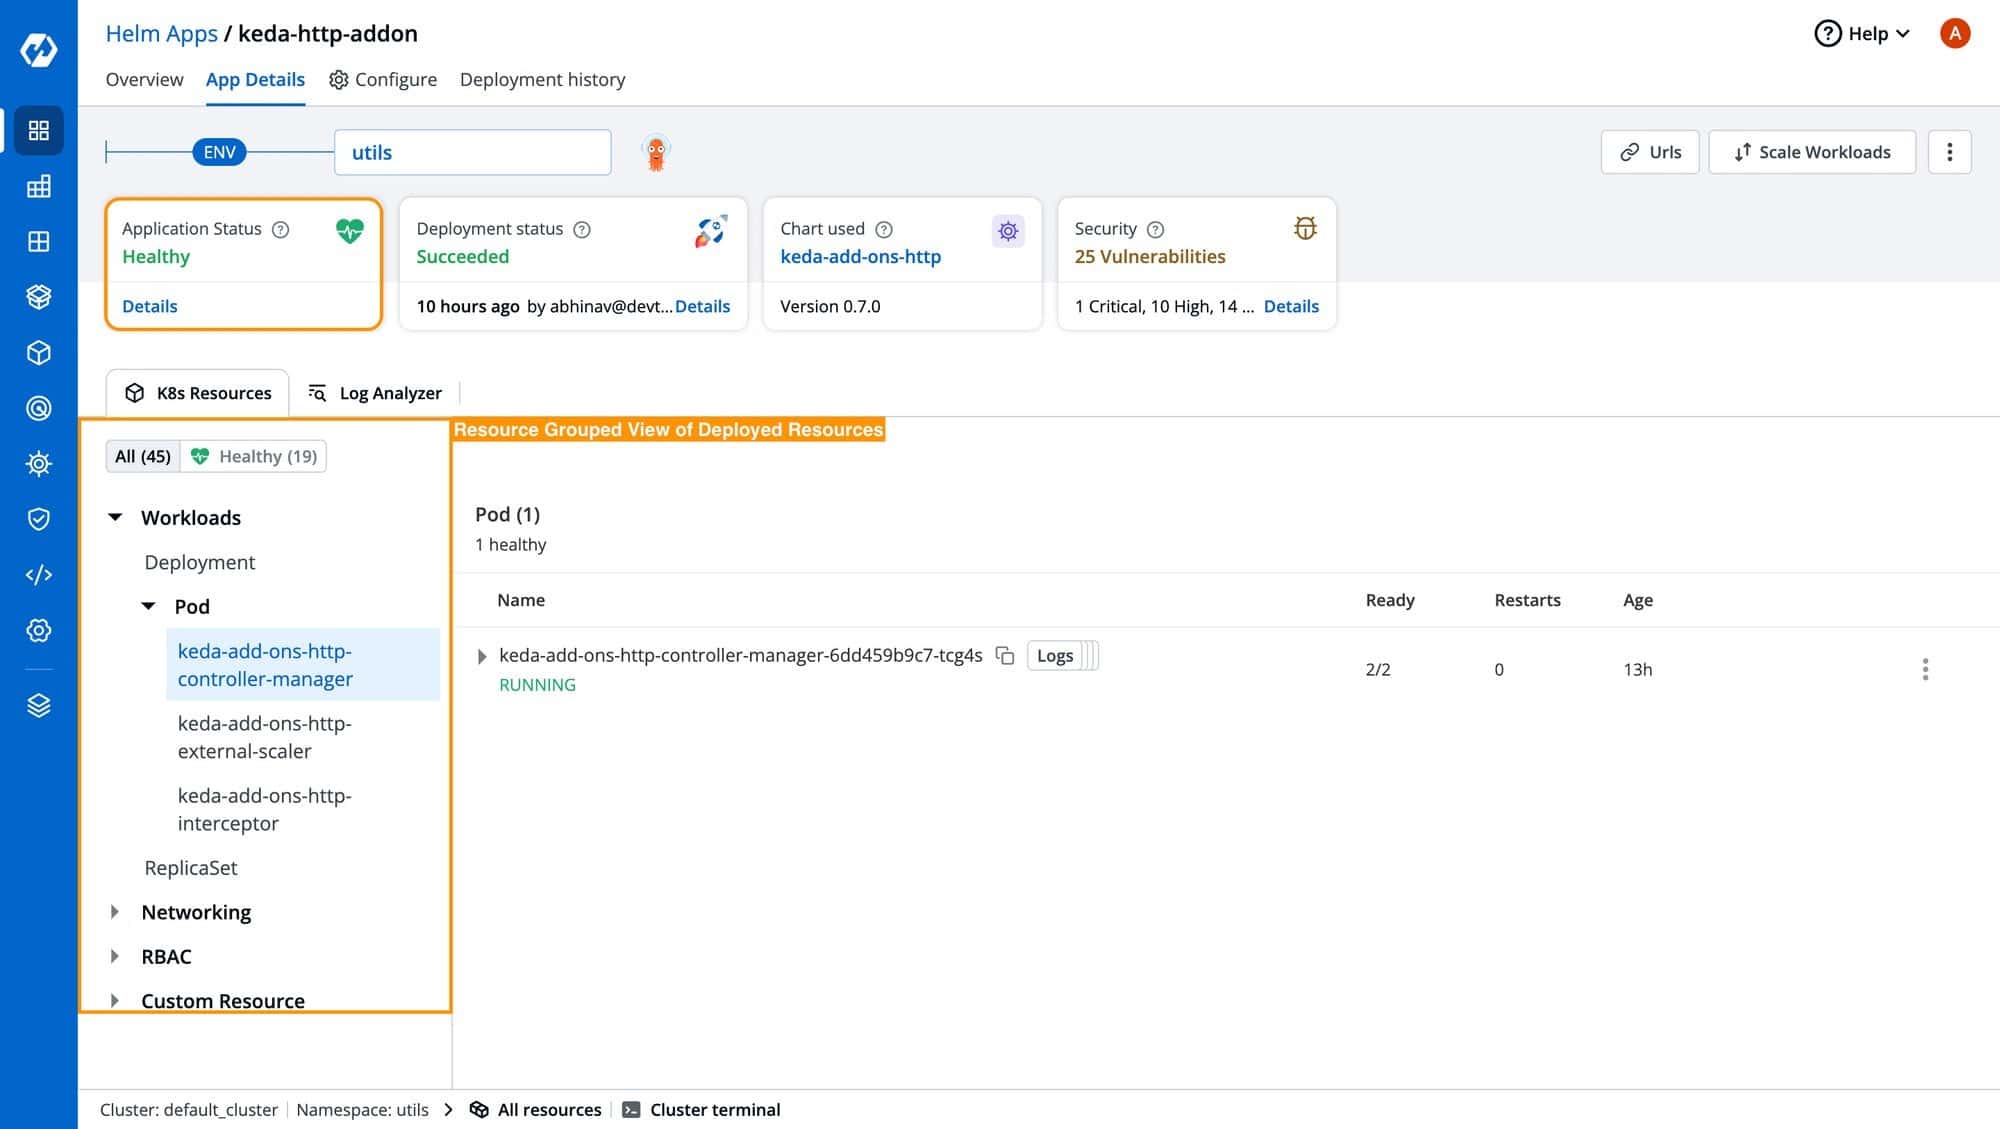
Step 1: Install the keda-add-on-http from the chart’s marketplace. Navigate to the charts store, search for Keda, and as you can see in the below image, you can see all charts related to Keda. Select the appropriate helm chart and deploy it. To add any helm chart which is not listed on the charts store, free feel to check out this blog.

Step 2: Once the controller has been successfully installed, you can see a consolidated view of the deployed helm chart, along with its resources.
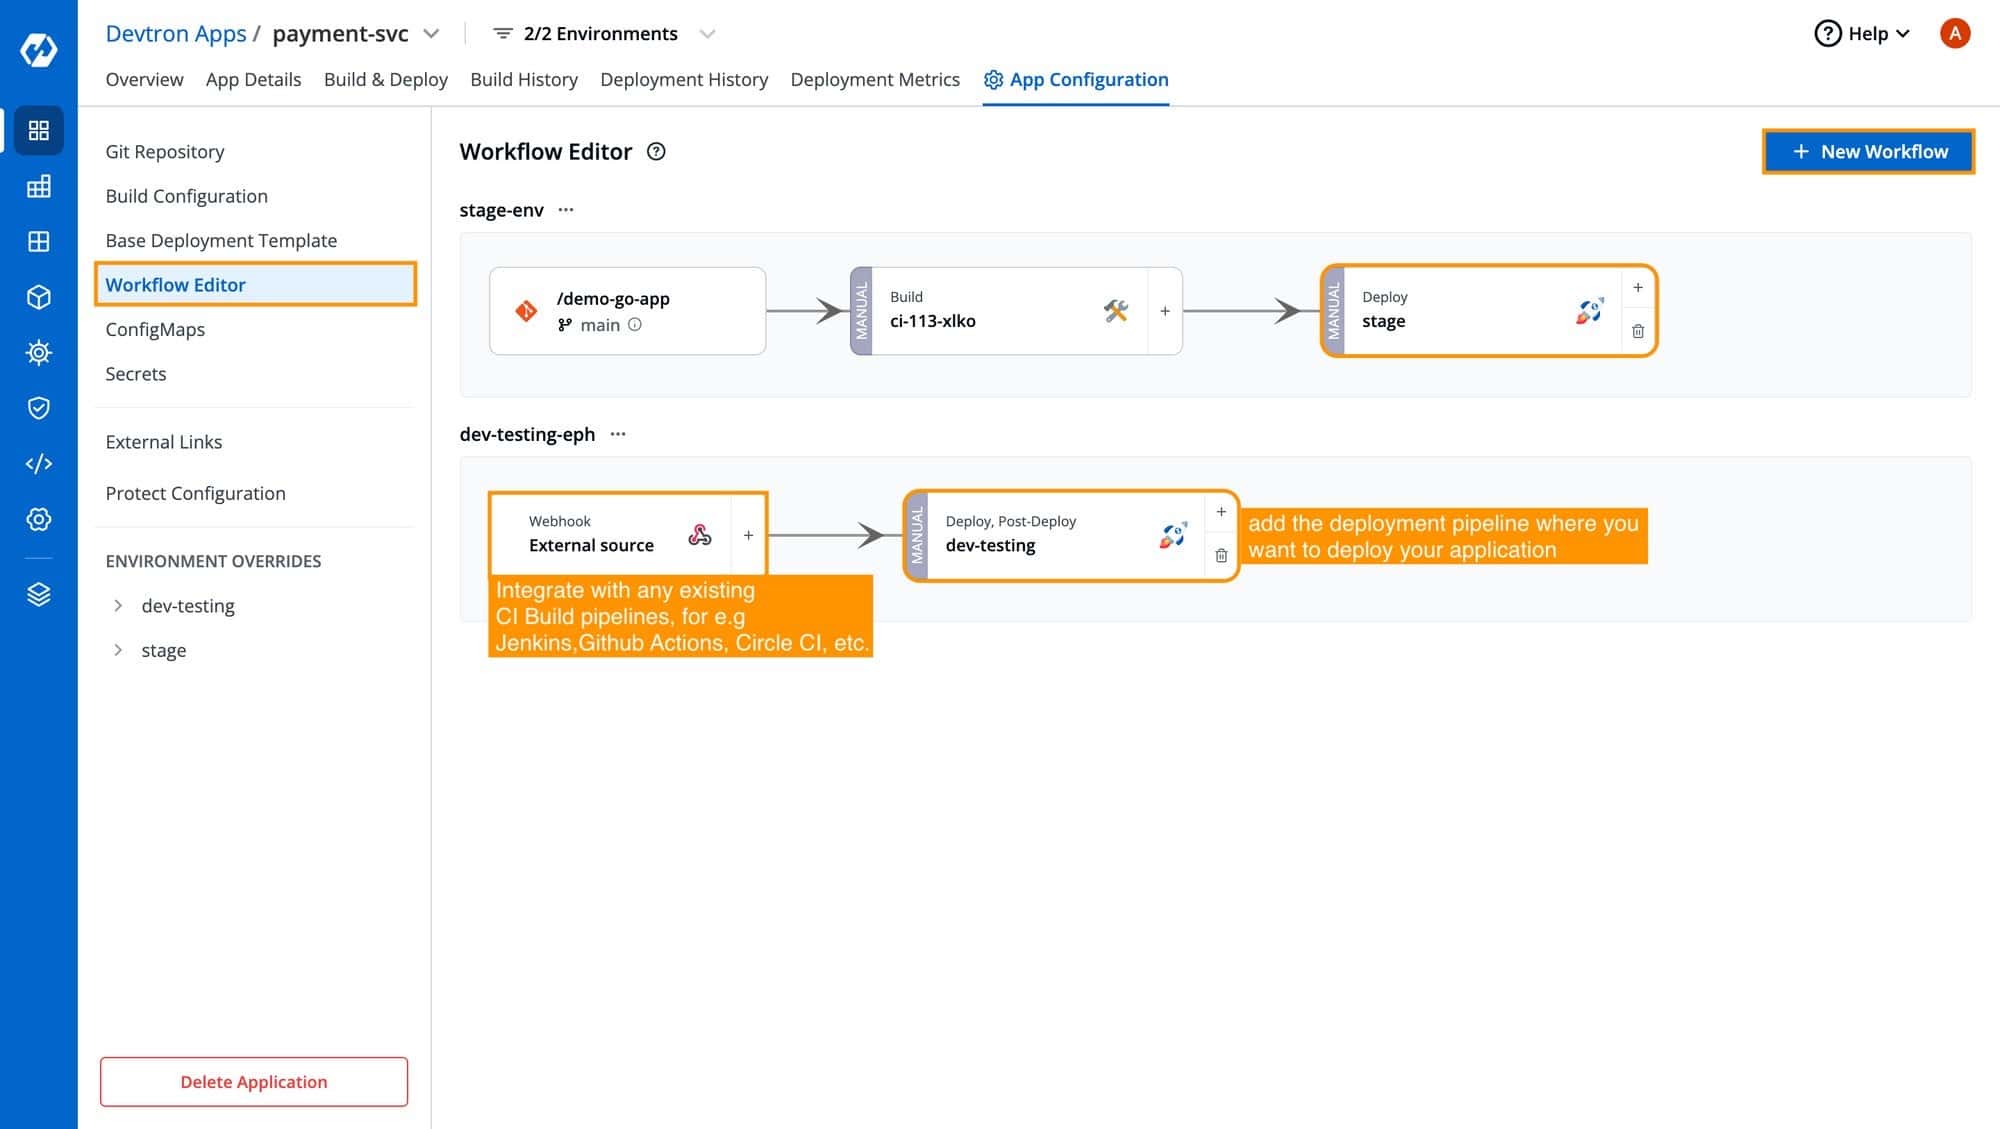
Step 3: Now, let’s move and configure the ephemeral environment for my microservice called, payment-svc. To configure the ephemeral environment for any application, the process remains the same and you should be able to configure/ clone the workflows for different applications. Navigate to Workflow Editor, add a workflow for the respective environment where you want to deploy your applications, in our case, its dev-testing environment as you can see in the below image. To understand more about workflows in Devtron, feel free to refer the official documentation.
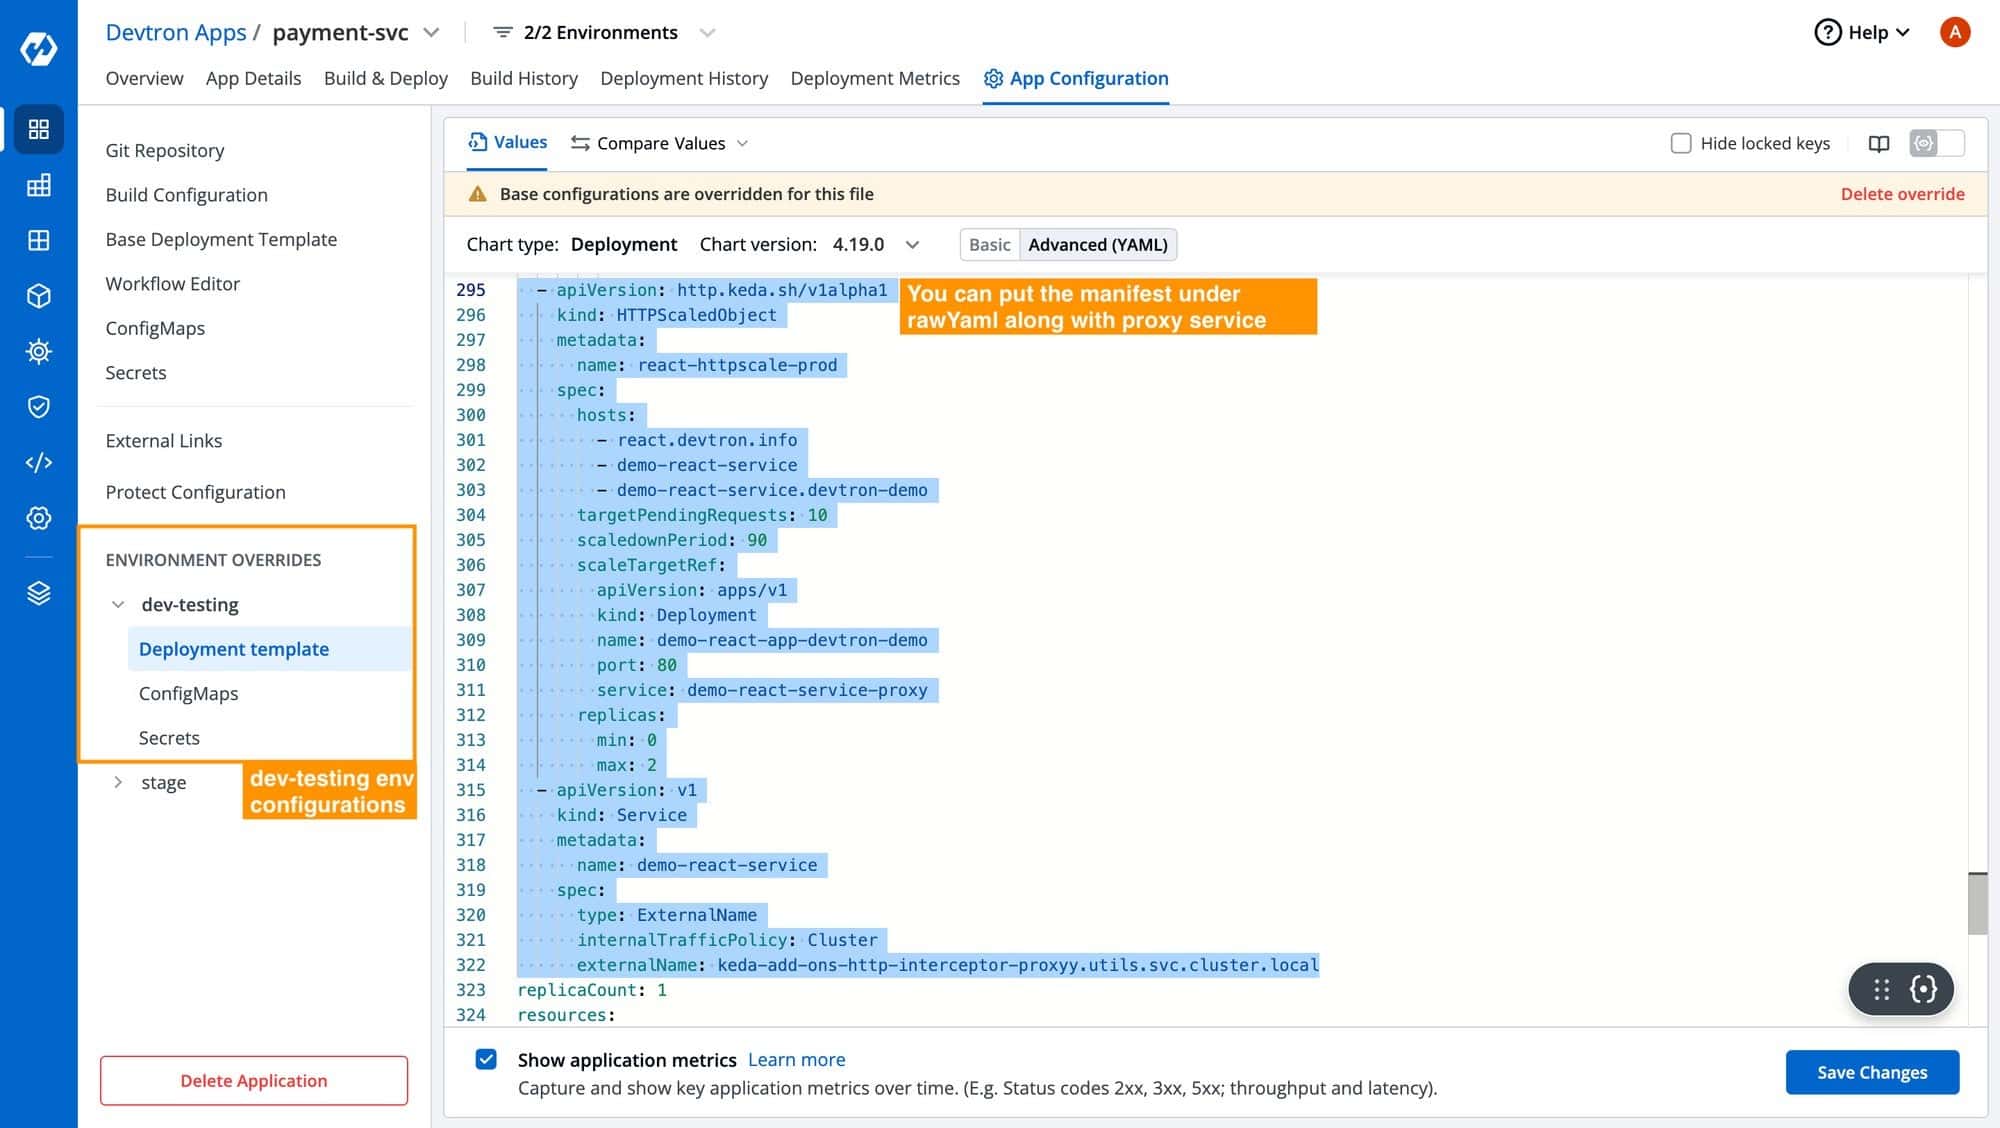
Step 4: Once the workflow has been created, Devtron automatically creates environment-overrides for the deployment environment. Environment overrides help you manage your Kubernetes configuration for the specific environment in a more efficient way. Under the environment override > dev-testing environment, we can add the relevant configurations required in the deployment template which would create the HttpScaledObject, responsible for bringing the environment up and running dynamically as it receives any HTTP request.
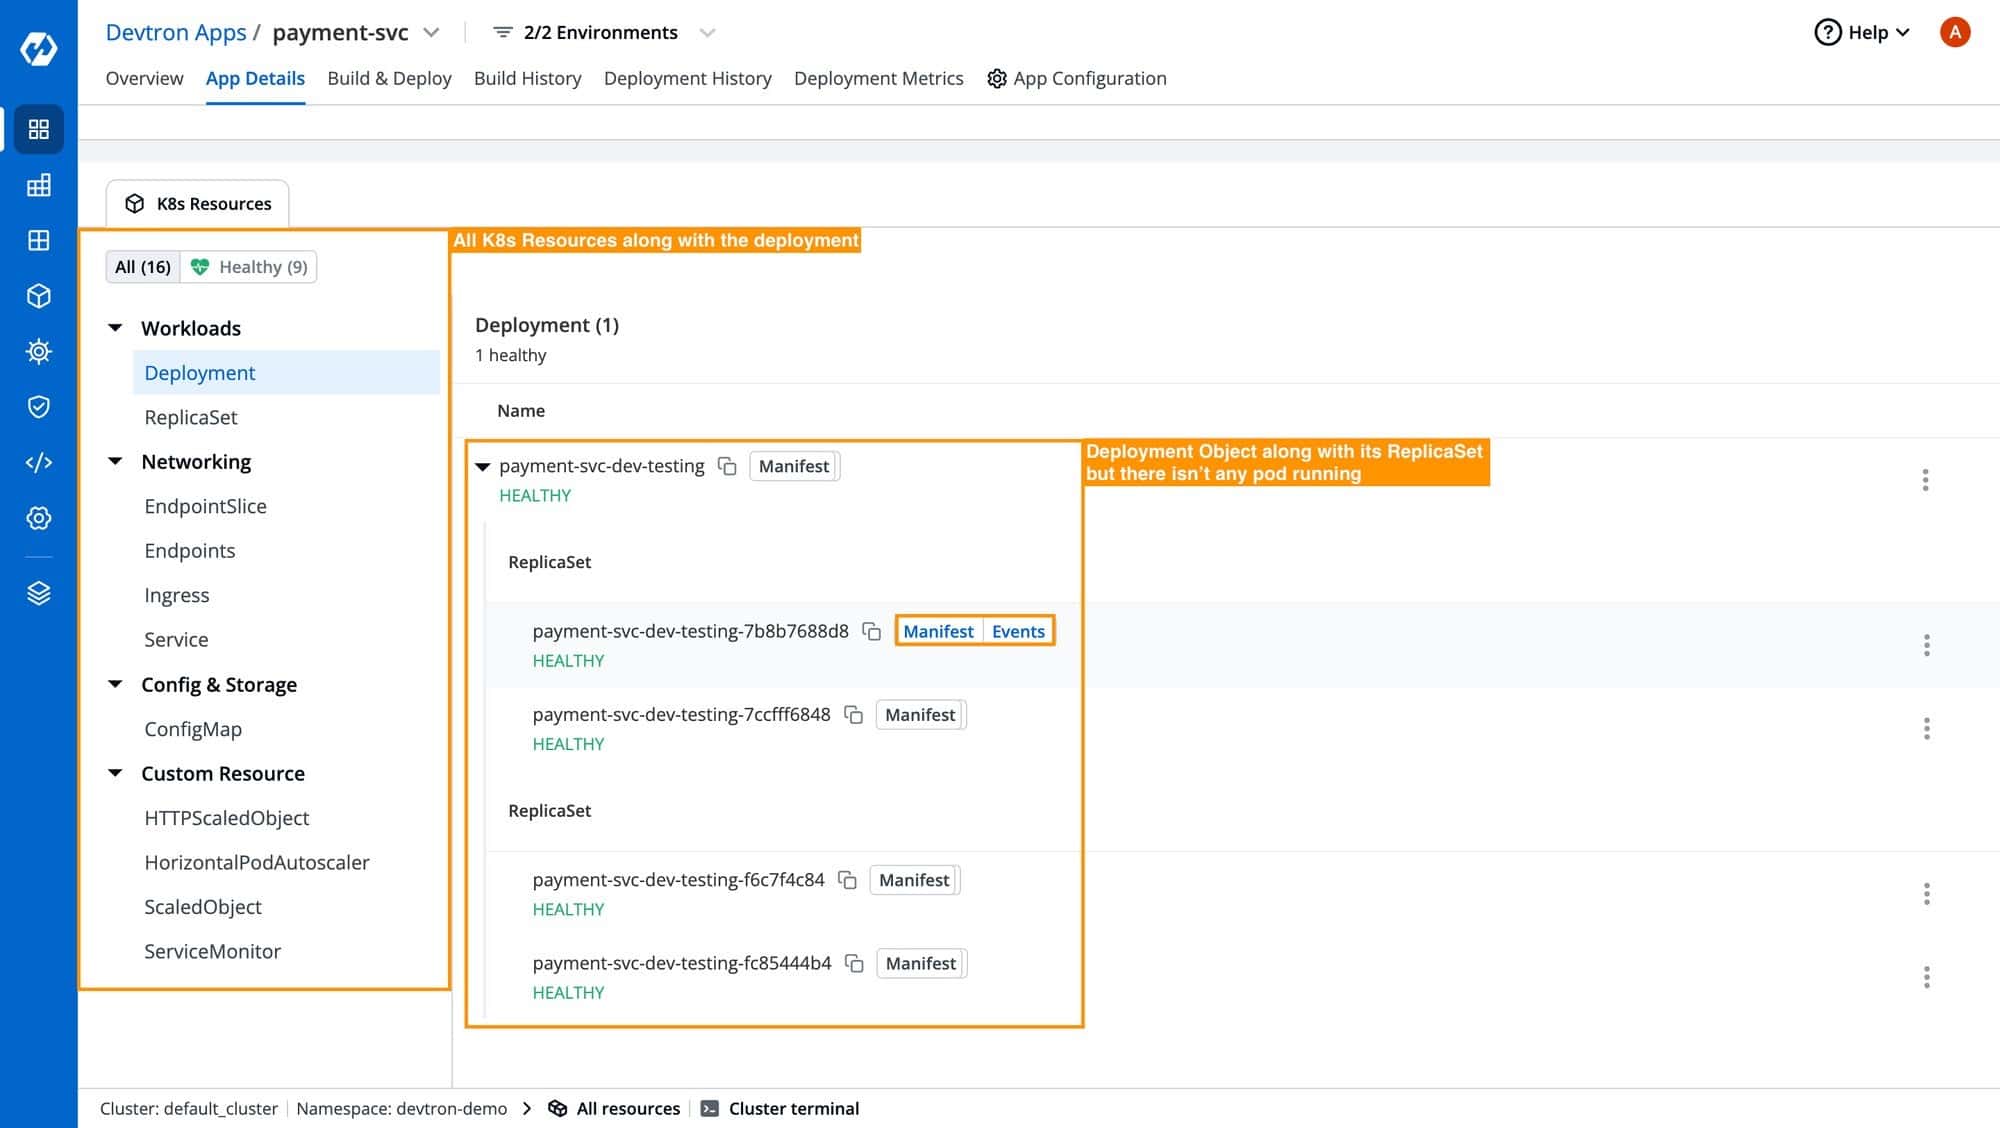
Step 5: After providing the relevant configuration, navigate to Build & Deploy section, select the relevant image, and deploy it in the dev-testing environment. Upon successful deployment, you can see the application status as Healthy, and all details about the deployment are as you can see in the below image.
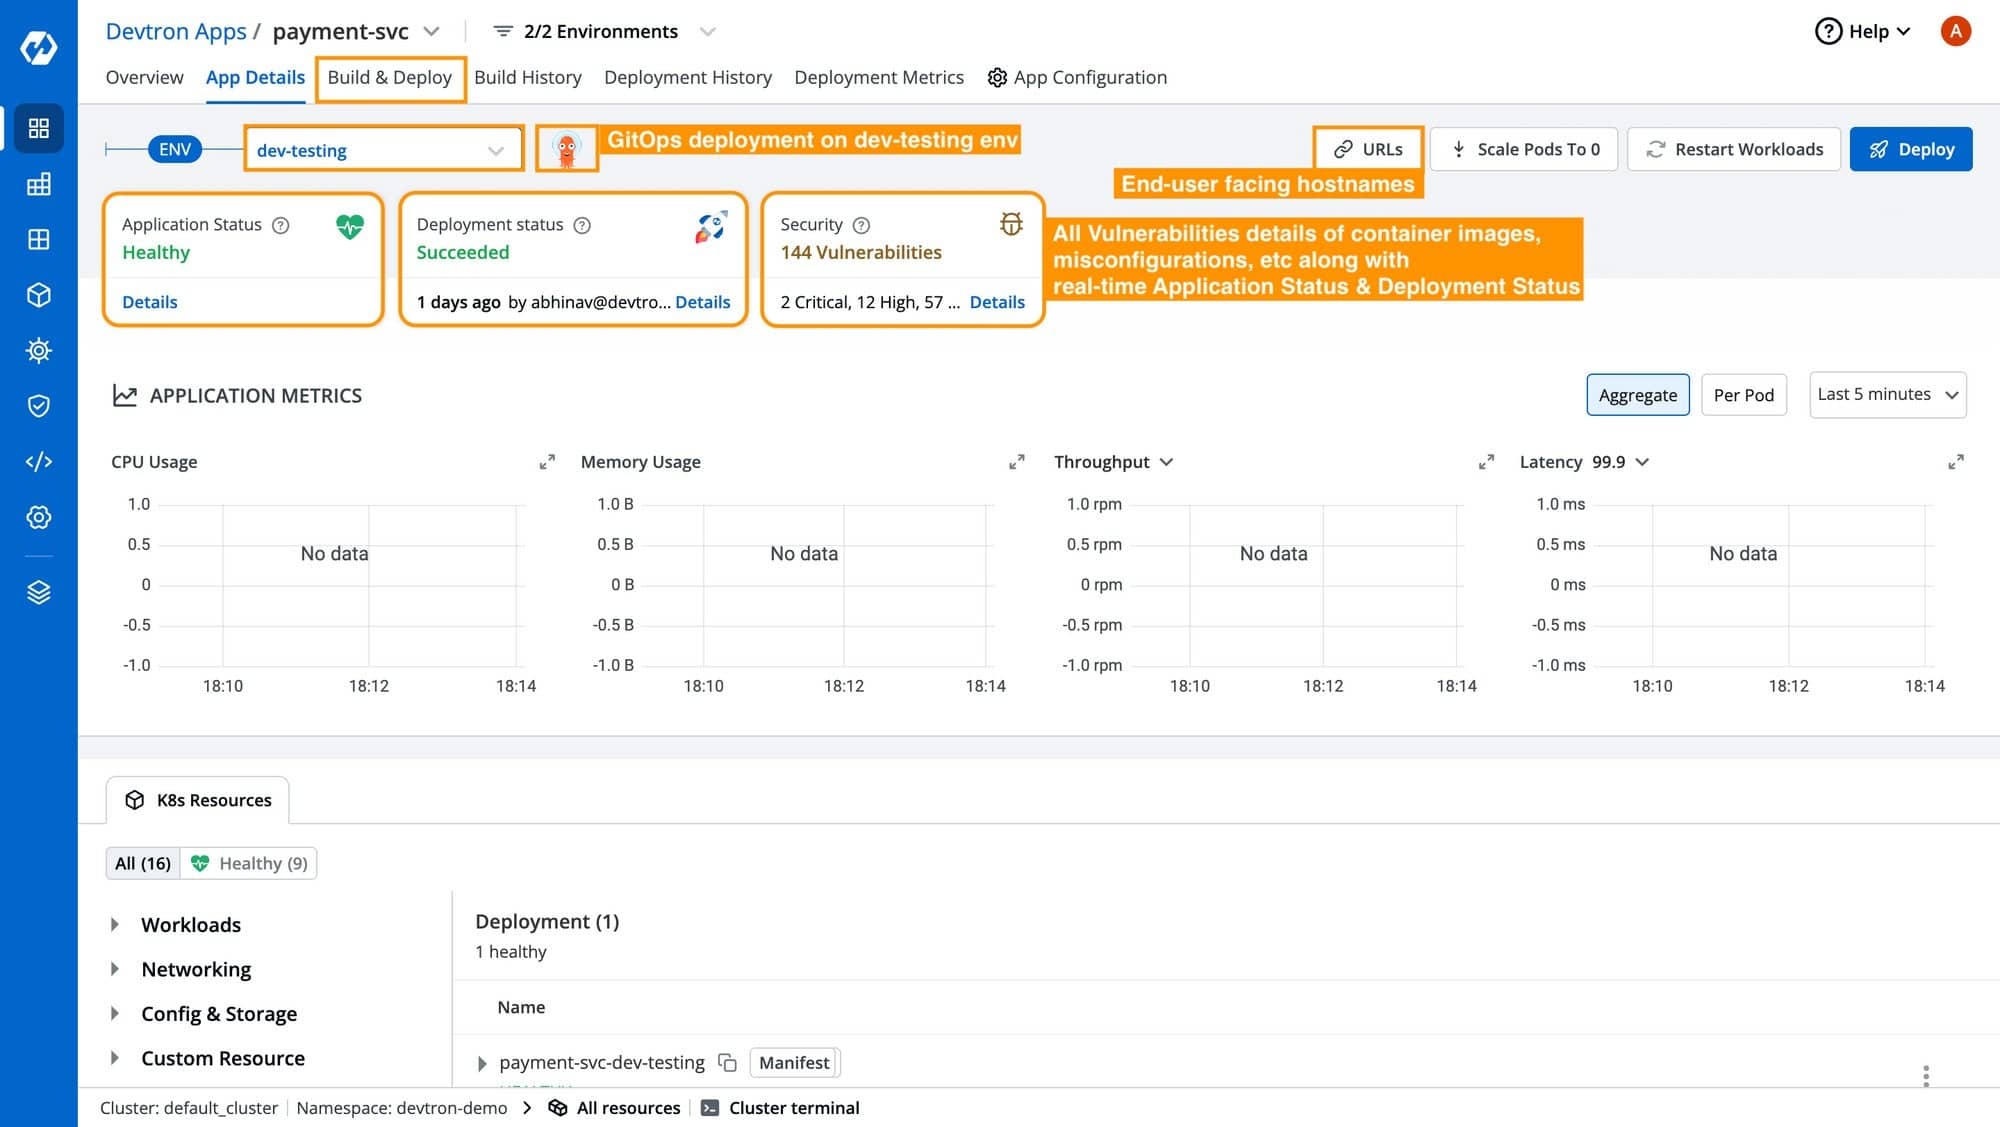
You can also see all the resources deployed along with the deployment in a resourced grouped view, and perform operations such as checking the logs, events, manifests, or exec into the terminals. You can notice in the below image that, we have a Deployment object but there isn’t any pod running as of now. This is because it automatically scaled down the workload since there is no HTTP request hitting the given hostname/ service.
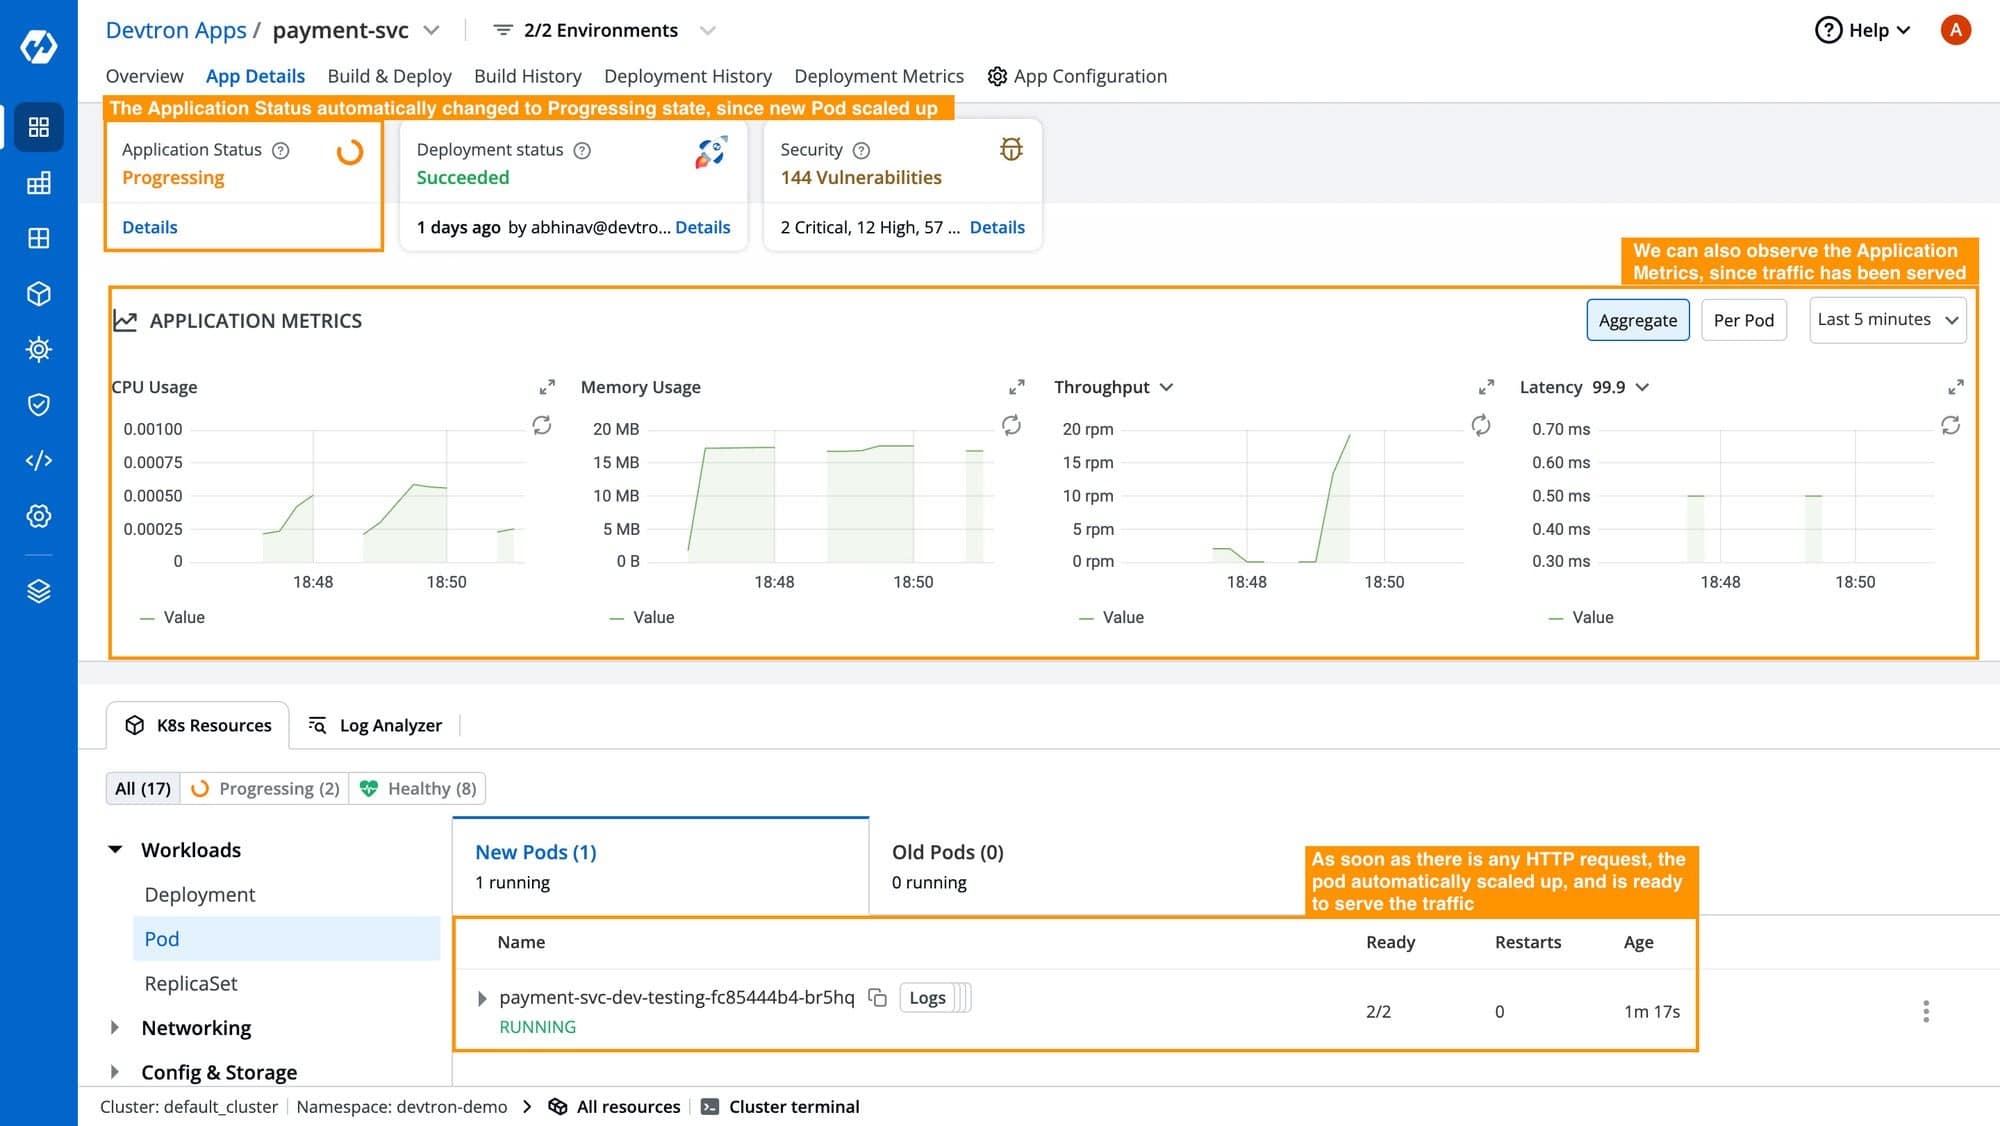
Step 6: In the Devtron dashboard, it automatically picks up the ingress host and shows it in URLs section at the top right of the dashboard as you can see in Fig. 5, and if any request has been made into the hostname, it will automatically scale up the pod and it can serve the traffic as you can see in the below image.
Conclusion
Ephemeral environments offer a flexible, cost-effective solution for managing development stages, particularly in a dynamic and fast-paced software development landscape. Devtron’s approach not only simplifies the management of these environments but also enhances cost efficiency and deployment agility.
Organizations looking to streamline their development processes and reduce costs should consider implementing ephemeral environments, especially those already using Kubernetes. With Devtron, the transition is smoother, allowing teams to focus more on innovation and less on infrastructure management.
Feel free to join our Discord Community if you have any questions. Would love to address any queries or questions. If you liked Devtron, do give it a Star ⭐️ on GitHub.