

Member post originally published on CyberArk’s blog by Shlomo Heigh
In today’s fast-paced world of DevOps and cloud-native applications, managing secrets securely is critical. CyberArk Conjur, a trusted solution for secrets management, has taken a significant step by integrating seamlessly with the External Secrets Operator (ESO). This collaboration brings together the best of both worlds: Conjur’s robust secret management capabilities and ESO’s flexibility in handling secrets across Kubernetes clusters.
At CyberArk, we strive to provide tools that companies can use to keep their most sensitive information secure. We also do our best to ensure information can be accessed when needed and only by an authorized person or process. In some ways, that’s the more challenging part of secrets management, especially when considering all the “places” where processes may be running – in public, private or hybrid clouds; SaaS services; on-prem workloads; and many more. This is why the Conjur team provides several APIs and native integrations to allow applications to seamlessly retrieve the secrets they need just as they need them.
With the massive growth of the cloud native ecosystem, particularly Kubernetes and its various flavors, such as OpenShift and Tanzu, one open source project has become a major player in handling this challenge – External Secrets Operator (ESO). ESO is an open source project under the Cloud Native Computing Foundation (CNCF), the same foundation that oversees Kubernetes’ development. ESO is popular because it’s a plug-and-play system that can be added to a Kubernetes cluster to handle the fetching of secrets from many secrets management systems and seamlessly provide them to workloads running in the cluster.
(Side note: There is another way to achieve similar results using the Kubernetes Secrets Store CSI Driver, which Conjur also supports. The pros and cons of each are out of the scope of this article. Still, the primary differences are that the CSI driver mounts secrets into pods, requires volumes and doesn’t use Kubernetes secrets, while ESO is at the cluster/namespace level and uses Kubernetes secrets.)
We’re pleased to announce that we’ve recently worked with the ESO maintainers team to increase the support for fetching secrets from Conjur using ESO. In this post, we’ll walk you through setting up a Kubernetes environment with an application that uses secrets stored in Conjur and provided with ESO.
Let’s jump right in!
Setting the stage
Note: This walkthrough will be quite technical and have plenty of code. It’s intended for those already familiar with Kubernetes and shell scripts.
A scripted demo is available at https://github.com/conjurdemos/Accelerator-K8s-External-Secrets/, simplifying the process of creating a proof of concept without needing to delve into all the intricacies. This post goes into all the details for those who want to understand exactly what’s happening at each step.
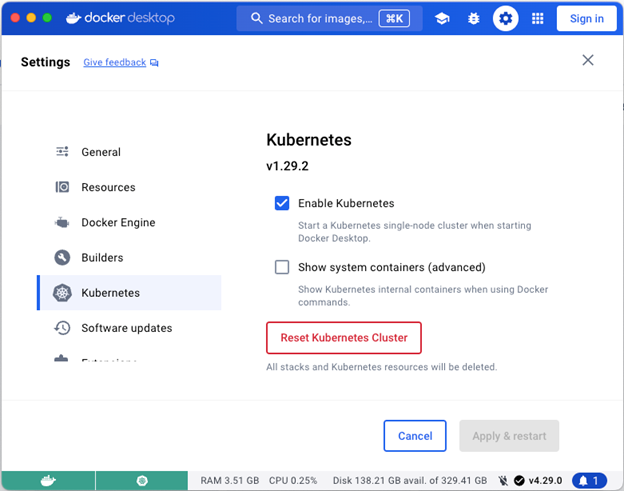
In this demo, we will use the distribution of Kubernetes included in Docker Desktop. You can enable it in the Settings screen, as seen here:
To illustrate using Conjur and ESO in a Kubernetes environment, we’ll deploy an application that relies on database connection details to run. We will then have ESO fetch those details from Conjur and inject them into Kubernetes Secrets, where the app can read them.
We will use our Pet Store Demo app for the application. You can see the code at https://github.com/conjurdemos/pet-store-demo, and its image is on DockerHub as cyberark/demo-app. This app requires four secrets as environment variables: DB_URL, DB_USERNAME, DB_PASSWORD, and DB_PLATFORM. We want to store these values in a secure location, so we’ll start by setting up Conjur as our secret store.
Setting up a Conjur Instance
We can easily install an instance of Conjur OSS right in our Kubernetes cluster using the Conjur OSS Helm charts. If you already have a Conjur instance, you can skip to the next section (Configuring Conjur).
$ CONJUR_NAMESPACE=conjur
$ kubectl create namespace "$CONJUR_NAMESPACE"
$ DATA_KEY="$(docker run --rm cyberark/conjur data-key generate)"
$ helm repo add cyberark https://cyberark.github.io/helm-charts
$ helm install -n "$CONJUR_NAMESPACE" --set dataKey="$DATA_KEY" --set authenticators="authn\,authn-jwt/eso" conjur cyberark/conjur-oss
$ CONJUR_ACCOUNT=demo
$ POD_NAME=$(kubectl get pods --namespace "$CONJUR_NAMESPACE" \
            -l "app=conjur-oss,release=conjur" \
            -o jsonpath="{.items[0].metadata.name}")
# This will create an account and print the API key. Store this in a safe place.
$ kubectl exec --namespace $CONJUR_NAMESPACE \
              $POD_NAME \
              --container=conjur-oss \
              -- conjurctl account create $CONJUR_ACCOUNT | tail -1
You now have an instance of Conjur running in your local Kubernetes cluster. To configure Conjur with the secrets the Pet Store Demo app will need, we must connect to it using the Conjur CLI. Since we’ve installed Conjur in Kubernetes, let’s go ahead and create a pod in the same namespace where we can run the CLI.
Save the following file as cli.yml:
apiVersion: apps/v1
kind: Deployment
metadata:
  name: conjur-cli
  labels:
    app: conjur-cli
spec:
  replicas: 1
  selector:
    matchLabels:
      app: conjur-cli
  template:
    metadata:
      name: conjur-cli
      labels:
        app: conjur-cli
    spec:
      containers:
      - name: conjur-cli
        image: cyberark/conjur-cli:8
        command: ["sleep"]
        args: ["infinity"]
Now run the following command to create the Conjur CLI deployment defined in the file:
$ kubectl apply -f cli.yml -n $CONJUR_NAMESPACE
Now, let’s get the name of the newly created CLI pod and log in to our Conjur instance.
$ CLI_POD_NAME=$(kubectl get pods --namespace "$CONJUR_NAMESPACE" -l "app=conjur-cli" -o jsonpath="{.items[0].metadata.name}")
$ CONJUR_URL=https://conjur-conjur-oss.$CONJUR_NAMESPACE.svc.cluster.local
$ kubectl exec -n $CONJUR_NAMESPACE $CLI_POD_NAME -ti -- conjur init -a $CONJUR_ACCOUNT -u $CONJUR_URL --self-signed
# Now login. When prompted for a password, paste in the API key returned from when you created the account above
$ kubectl exec -n $CONJUR_NAMESPACE $CLI_POD_NAME -ti -- conjur login -i admin
We now have a pod running with the CLI and are logged into our Conjur instance as the administrator. We’re now ready to start creating policies and variables!
Configuring Conjur
We need to configure Conjur to:
- Store the secrets needed by the demo app.
- Allow the External Secrets Operator to authenticate to Conjur.
- Allow the External Secrets Operator to fetch the secrets for the demo app.
To avoid storing an API key to access Conjur, another secret to manage, we will use the Kubernetes native Service Account Tokens to allow ESO to authenticate to Conjur. Let’s start by creating a Conjur policy file that defines a JWT authenticator that ESO will use to authenticate. Create the following file and save it as authn-jwt.yml:
- !policy
  id: conjur/authn-jwt/eso
  annotations:
    description: Configuration for AuthnJWT service
  body:
    - !webservice

    # - !variable jwks-uri
    - !variable public-keys
    - !variable issuer
    - !variable token-app-property
    - !variable identity-path
    - !variable audience

    # Group of applications that can authenticate using this JWT Authenticator
    - !group users

    - !permit
      role: !group users
      privilege: [ read, authenticate ]
      resource: !webservice

    - !webservice status

    # Group of users who can check the status of the JWT Authenticator
    - !group operators

    - !permit
      role: !group operators
      privilege: [ read ]
      resource: !webservice status
Now, create another file called authn-jwt-apps.yml. We’re going to use “demo-app” for the namespace name and “demo-app-sa” for the service account name:
- !policy
  id: conjur/authn-jwt/eso/apps
  annotations:
    description: Identities permitted to authenticate with the AuthnJWT service
  body:
    - !group

    - &hosts
      - !host
        id: system:serviceaccount:demo-app:demo-app-sa
        annotations:
          authn-jwt/eso/sub: system:serviceaccount:demo-app:demo-app-sa

    - !grant
        role: !group
        members: *hosts

- !grant
    role: !group conjur/authn-jwt/eso/users
    member: !group conjur/authn-jwt/eso/apps
Now, create a third and final policy file that will define the secrets the application needs and grant ESO access. Save this one as secrets.yml:
- !policy
  id: secrets
  body:
    - &variables
      - !variable db/url
      - !variable db/username
      - !variable db/password
      - !variable db/platform

    - !group users

    - !permit
      resources: *variables
      role: !group users
      privileges: [ read, execute ]

- !grant
  role: !group secrets/users
  members:
    - !host conjur/authn-jwt/eso/apps/system:serviceaccount:demo-app:demo-app-sa
We must now copy these files to the CLI pod and load them into Conjur. Assuming you’re using the Conjur instance we created in the previous step, the commands would be as follows:
$ kubectl cp -n $CONJUR_NAMESPACE authn-jwt.yml $CLI_POD_NAME:/
$ kubectl cp -n $CONJUR_NAMESPACE authn-jwt-apps.yml $CLI_POD_NAME:/
$ kubectl cp -n $CONJUR_NAMESPACE secrets.yml $CLI_POD_NAME:/

$ kubectl exec -n $CONJUR_NAMESPACE $CLI_POD_NAME -- conjur policy load -b root -f authn-jwt.yml
$ kubectl exec -n $CONJUR_NAMESPACE $CLI_POD_NAME -- conjur policy load -b root -f authn-jwt-apps.yml
$ kubectl exec -n $CONJUR_NAMESPACE $CLI_POD_NAME -- conjur policy load -b root -f secrets.yml
Now, let’s populate the values of all those variables we just created. First we’ll do the ones necessary for the JWT authenticator. This will allow Conjur to verify that Kubernetes has issued the JWT presented by ESO.
# Get the necessary JWT info from the Kubernetes API
$ ISSUER="$(kubectl get --raw /.well-known/openid-configuration | jq -r '.issuer')"
$ JWKS_URI="$(kubectl get --raw /.well-known/openid-configuration | jq -r '.jwks_uri')"
$ kubectl get --raw "$JWKS_URI" > jwks.json
$ kubectl cp -n $CONJUR_NAMESPACE jwks.json $CLI_POD_NAME:/
$ kubectl exec -n $CONJUR_NAMESPACE $CLI_POD_NAME -- conjur variable set -i "conjur/authn-jwt/eso/token-app-property" -v "sub"
$ kubectl exec -n $CONJUR_NAMESPACE $CLI_POD_NAME -- conjur variable set -i "conjur/authn-jwt/eso/issuer" -v "$ISSUER"
$ kubectl exec -n $CONJUR_NAMESPACE $CLI_POD_NAME -- conjur variable set -i "conjur/authn-jwt/eso/public-keys" -v "{\"type\":\"jwks\", \"value\":$(cat jwks.json)}"
$ kubectl exec -n $CONJUR_NAMESPACE $CLI_POD_NAME -- conjur variable set -i "conjur/authn-jwt/eso/identity-path" -v "conjur/authn-jwt/eso/apps"
$ kubectl exec -n $CONJUR_NAMESPACE $CLI_POD_NAME -- conjur variable set -i "conjur/authn-jwt/eso/audience" -v "https://conjur-conjur-oss.$CONJUR_NAMESPACE.svc.cluster.local"
Note: We need to make sure that the JWT authenticator is enabled in the Conjur configuration. (“Configuring Conjur”), we did this by providing the “authenticators” property in the `helm install` command. If you’re using a different Conjur instance, make sure you enable it by following the steps in “Step 2: Allowlist the authenticators” section of the documentation (TL;DR: add “authn-jwt/eso” to the “CONJUR_AUTHENTICATORS” environment variable on the Conjur container).
We can now add the values for the demo app’s secrets. Later, we’ll use these same values to configure the database service.
$ kubectl exec -n $CONJUR_NAMESPACE $CLI_POD_NAME -- conjur variable set -i "secrets/db/url" -v "postgresql://db.demo-app.svc.cluster.local:5432/demo-app"
$ kubectl exec -n $CONJUR_NAMESPACE $CLI_POD_NAME -- conjur variable set -i "secrets/db/username" -v "db-user"
$ kubectl exec -n $CONJUR_NAMESPACE $CLI_POD_NAME -- conjur variable set -i "secrets/db/password" -v "P0stgre5P@ss%"
$ kubectl exec -n $CONJUR_NAMESPACE $CLI_POD_NAME -- conjur variable set -i "secrets/db/platform" -v "postgres"
Installing ESO
Let’s install the ESO in our cluster to act as a broker to pull secrets from Conjur. You can use any version since v0.9.17, but by default, this will use the newest release.
$ helm repo add external-secrets https://charts.external-secrets.io
$ helm install external-secrets external-secrets/external-secrets -n external-secrets --create-namespace
We’ll need a Kubernetes namespace to put all of our demo app-related objects. Let’s create one now. This will allow us to use separate ESO stores if we want to provide secrets to a different app running in a different namespace. Remember, it’s always best to limit the access to secrets to the minimum number of processes. In this case, we only need them in the demo app’s namespace.
$ kubectl create namespace demo-appNow, let’s load some configuration, so ESO knows how to connect to Conjur using a Kubernetes service account token. Copy the following into an editor and save it as service-account.yml:
---
apiVersion: v1
kind: ServiceAccount
metadata:
  name: demo-app-sa
  namespace: demo-app
---
apiVersion: v1
kind: Secret
type: kubernetes.io/service-account-token
metadata:
  name: demo-app-sa-secret
  namespace: demo-app
  annotations:
    kubernetes.io/service-account.name: "demo-app-sa"
Now we need to create a SecretStore that will tell ESO how to connect to Conjur using the Service Account Token “demo-app-sa” we created and gave access to the demo app’s secrets. But first, you’ll need to replace the value of the CA bundle with the CA cert used by Conjur since we’re using a self-signed certificate that ESO won’t know to trust. You can get the value by running:
kubectl get secret -n conjur conjur-conjur-ssl-ca-cert -o jsonpath="{.data['tls\.crt']}"Now save the following into a “eso-jwt-provider.yml” file. Note that you’ll need to replace the URLs and other connection details if you’re using different settings.
---
apiVersion: external-secrets.io/v1beta1
kind: SecretStore
metadata:
  name: conjur-jwt
  namespace: demo-app
spec:
  provider:
    conjur:
      url: https://conjur-conjur-oss.conjur.svc.cluster.local
      caBundle: # Paste output of the previous command here
      auth:
        jwt:
          account: demo
          serviceID: eso
          serviceAccountRef:
            name: demo-app-sa
            audiences:
              - https://conjur-conjur-oss.conjur.svc.cluster.local
Load these manifest files into Kubernetes:
$ kubectl apply -f service-account.yml
$ kubectl apply -f eso-jwt-provider.yml
Now that we have the basic configuration for ESO set up let’s install our demo app.
The Demo Application
Before creating the demo application, let’s create the database service it’ll connect to.
We’re using the same credentials that we populated in the Conjur variables for the demo app.
$ helm repo add bitnami https://charts.bitnami.com/bitnami
$ helm install postgresql bitnami/postgresql -n demo-app --set "auth.username=db-user" --set "auth.password=P0stgre5P@ss%" --set "auth.database=demo-app" --set "fullnameOverride=db" --set "tls.enabled=true" --set "tls.autoGenerated=true"
Save the following manifest to a file called “demo-app.yml”:
---
apiVersion: v1
kind: Service
metadata:
  name: demo-app
  namespace: demo-app
  labels:
    app: demo-app
spec:
  ports:
  - protocol: TCP
    port: 8080
    targetPort: 8080
  selector:
    app: demo-app
  type: NodePort
---
apiVersion: apps/v1
kind: Deployment
metadata:
  labels:
    app: demo-app
  name: demo-app
  namespace: demo-app
spec:
  replicas: 1
  selector:
    matchLabels:
      app: demo-app
  template:
    metadata:
      labels:
        app: demo-app
    spec:
      serviceAccountName: demo-app-sa
      containers:
      - name: demo-app
        image: cyberark/demo-app:latest
        imagePullPolicy: IfNotPresent
        ports:
        - name: http
          containerPort: 8080
        readinessProbe:
          httpGet:
            path: /pets
            port: http
          initialDelaySeconds: 15
          timeoutSeconds: 5
        env:
          - name: DB_URL
            valueFrom:
              secretKeyRef:
                name: db-credentials
                key: url
          - name: DB_USERNAME
            valueFrom:
              secretKeyRef:
                name: db-credentials
                key: username
          - name: DB_PASSWORD
            valueFrom:
              secretKeyRef:
                name: db-credentials
                key: password
          - name: DB_PLATFORM
            valueFrom:
              secretKeyRef:
                name: db-credentials
                key: platform
You can see that this app will take its environment variables from Kubernetes secrets. But we haven’t created any yet! Let’s add configuration to ESO to instruct it to sync those secrets from Conjur into Kubernetes, where the app can reach them.
Save the following as “external-secret.yml”:
---
apiVersion: external-secrets.io/v1beta1
kind: ExternalSecret
metadata:
  name: external-secret
  namespace: demo-app
spec:
  # Optional: refresh the secret at an interval
  # refreshInterval: 10s
  secretStoreRef:
    name: conjur-jwt
    kind: SecretStore
  target:
    # The Kubernetes secret that will be created
    name: db-credentials
    creationPolicy: Owner
  data:
  # The keys in the Kubernetes secret that will be populated,
  # along with the path of the Conjur secret that will be used
  - secretKey: url
    remoteRef:
      key: secrets/db/url
  - secretKey: username
    remoteRef:
      key: secrets/db/username
  - secretKey: password
    remoteRef:
      key: secrets/db/password
  - secretKey: platform
    remoteRef:
      key: secrets/db/platform
Now, for the moment of truth, let’s load these files into Kubernetes.
$ kubectl apply -f external-secret.yml
$ kubectl apply -f demo-app.yml
If all goes well, you should be able to see a successful startup message in the demo app’s logs:
$ DEMO_POD_NAME=$(kubectl get pods --namespace demo-app -l "app=demo-app" -o jsonpath="{.items[0].metadata.name}")
$ kubectl logs $DEMO_POD_NAME -n demo-app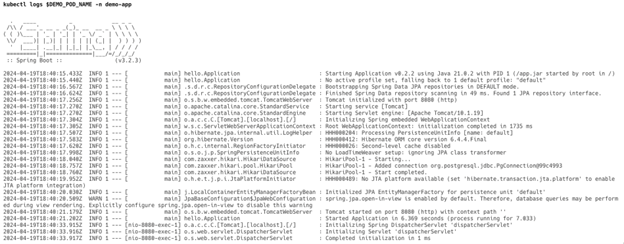
This means that the app is successfully connecting to the database using the credentials stored in Conjur.
You can even verify that the app is working by deploying a pod containing ‘curl’ and running a test query to the app:
---
apiVersion: v1
kind: Pod
metadata:
  name: curl
  labels:
    name: curl
spec:
  containers:
  - name: curl
    image: curlimages/curl:latest
    imagePullPolicy: Always
    command: ["sh", "-c", "tail -f /dev/null"]
After applying that, run:
$ kubectl exec curl -- curl -X POST -H 'Content-Type: application/json' --data '{"name":"Accelerator Alice"}' http://demo-app.demo-app.svc.cluster.local:8080/pet
$ kubectl exec curl -- curl http://demo-app.demo-app.svc.cluster.local:8080/pets
It should successfully create a new “pet” in the first request and return it when you run the second. This illustrates that the app can perform database operations using the credentials stored and retrieved from Conjur.
And that’s it! There are tons more options – for example, you can adjust your external-secret.yml spec to fetch several Conjur secrets by searching with a regex or matching on annotations, but for that, you’ll need to check out the documentation! Hopefully, this provides a helpful starting point, and you will now have a deep understanding of how the Conjur – ESO integration works.
If you’ve read to the end, thank you! You’re a champ 💪
Now, go secure your software!

Shlomo is a senior software engineer at CyberArk working on Conjur Secrets Manager. He’s an open source and AppSec enthusiast, a member of the CNCF TAG Security and a contributor to multiple OWASP projects. In his free time, you can find him spending time with his wife and daughter, 3D printing, woodworking or hiking.