

Community blog post by Reza Ramezanpour, developer advocate at Tigera
Kubernetes is known for its modularity, and its integration with cloud environments. Throughout its history, Kubernetes provided in-tree cloud provider integrations with most providers, allowing us to create cloud-related resources via API calls without requiring us to jump through hoops to deploy a cluster that utilizes the power of underlying networking infrastructure. However, this behavior will change with the release of Kubernetes v1.31, and right now is the best time to plan for it.
In this blog post, we will examine cloud-provider integrations with Google Cloud Provider infrastructure, how it works, and how we can upgrade to later versions of Kubernetes without breaking our environment.
What is a cloud provider integration?
The cloud provider controller in Kubernetes is responsible for establishing communication between the cluster and cloud services through HTTP/S requests. It handles tasks like integrating cloud-based resources, such as storage or load balancers, into the cluster’s operations. For example, persistent volumes are often tied to disk claims managed relying to the cloud provider. Additionally, the controller supports other cloud integrations, such as automatically provisioning load balancers for external/internal service exposure.
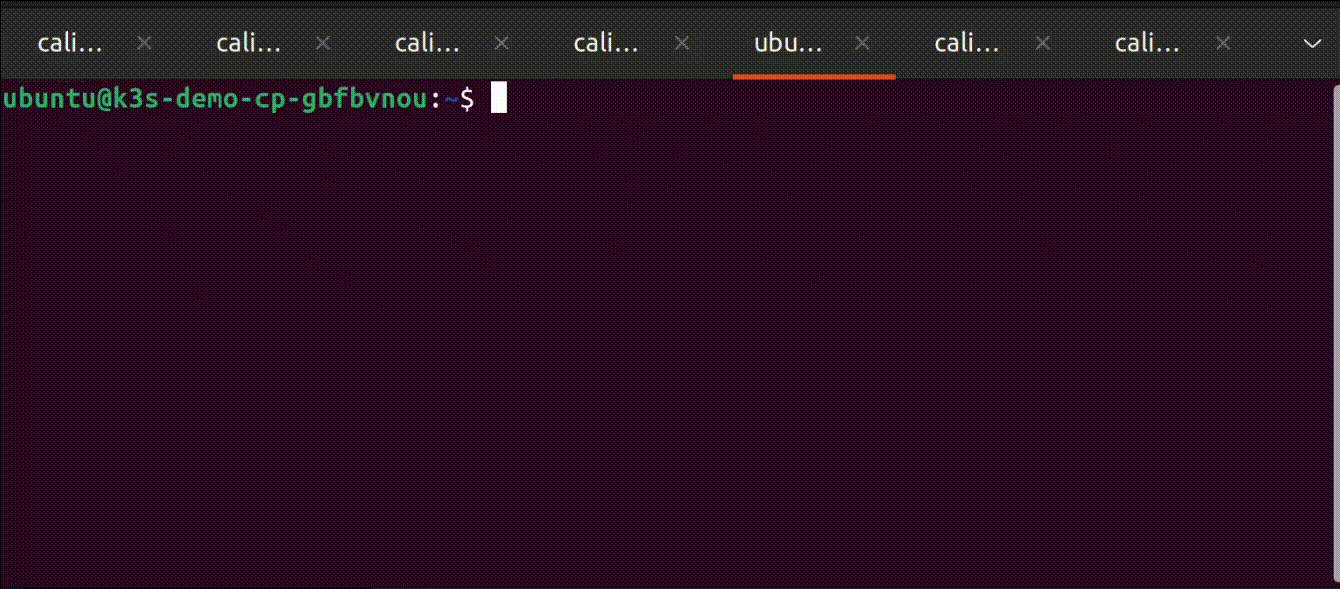
The most notable way to think about cloud provider integration is when you create a service with the type load balancer in your cluster and wait for the magic to change the external-ip from <pending> to an actual IP address.
The following image illustrates the moment that we’re all waiting to see; everything looks as it should:
Why the Kubernetes community is removing in-tree integrations
The primary goal of this move is to give cloud providers the ability to develop and release their services independently from Kubernetes’ core release cycle, and to level the playing field for clouds that do not have in-tree providers. By separating cloud provider-specific code from the core of Kubernetes, there’s a clear delineation of responsibilities between “Kubernetes core” and cloud providers within the ecosystem. This also ensures consistency and flexibility in how cloud providers integrate their services with Kubernetes.
By housing each cloud provider’s code in its own repository or module, several advantages emerge:
- The core Kubernetes components (such as kubelet, kube-apiserver, and kube-controller-manager) will no longer rely on cloud provider-specific APIs and their associated dependencies, leading to leaner binaries and reducing potential security risks from external dependencies.
- Cloud providers can release new features or bug fixes on their own schedule, without being tied to the Kubernetes release timeline.
This approach fosters more agile development and a streamlined core Kubernetes ecosystem.
Now, if you are ready, let’s continue building a cluster with out-of-tree GCP cloud provider support.
Requirements
This blog post has no requirements. You can go through it like your favorite novel and learn the necessary steps to up your game. However, if you like to get your hands dirty there are a couple of requirements that allow you to build the environment in your own Google Cloud account.
- A Google Cloud account
- Google Cloud Cli configured with your account
- git
- Terraform
- Access to internet
The demo cluster
To help you better understand the process, I’ve developed a demo script project using Terraform, which is available on GitHub. It helps you quickly set up a testing environment and allows you to follow the steps of this tutorial.
Clone the repository.
git clone https://github.com/frozenprocess/demo-cluster.git
cd demo-cluster
Copy the gcp template from the examples folder to the current directory.
cp examples/main.tf-gcpmulticluster main.tfOpen the “main.tf” in your favorite editor and change the automatic cloud integration to “true”.
Note: If you are on a trial account, adjust your cloud instance in the “main.tf” file to the ones permitted for trial use (line #23 and #28).
Change line 25 from:
disable_cloud_provider = false… to:
disable_cloud_provider = trueUse the following command to install the required provider:
terraform initNote: Completing the following step will populate cloud resources in your account and you will be charged for the duration you use them.
After that, issue the following command, review the resources that will be populated in your Google Cloud account, and submit the prompt.
terraform apply Use the “demo-connection” from the output to ssh into the instance.
GCP permissions
The environment created by the demo-cluster project has permissions embedded with the virtual machine instance that are crucial in enabling cloud-provider integration. These roles and IAM permissions that are associated with the instance will be the identity that issues the resource request to create the necessary cloud resources.
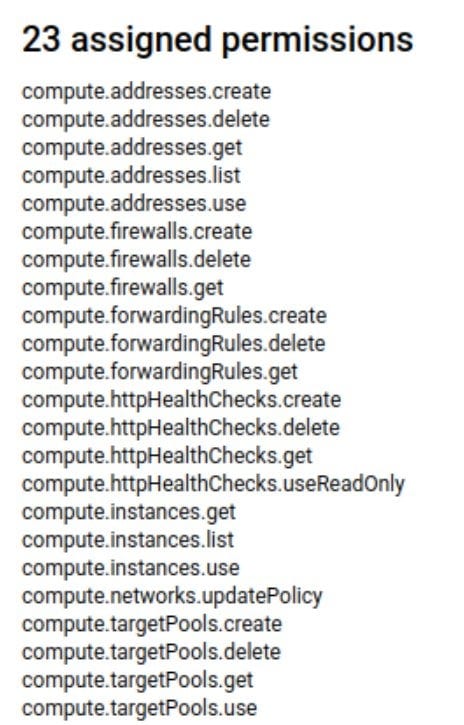
Note: You can examine the list of minimum permissions required to enable load balancer creation associated with the demo instance here.
If you are trying to accomplish the cloud provider integration in your environment, please make sure that you have a role that provides the following permissions:
After creating this role, you will need to create an IAM service account identity to associate with the roles. This can be done via Google Cloud Console.

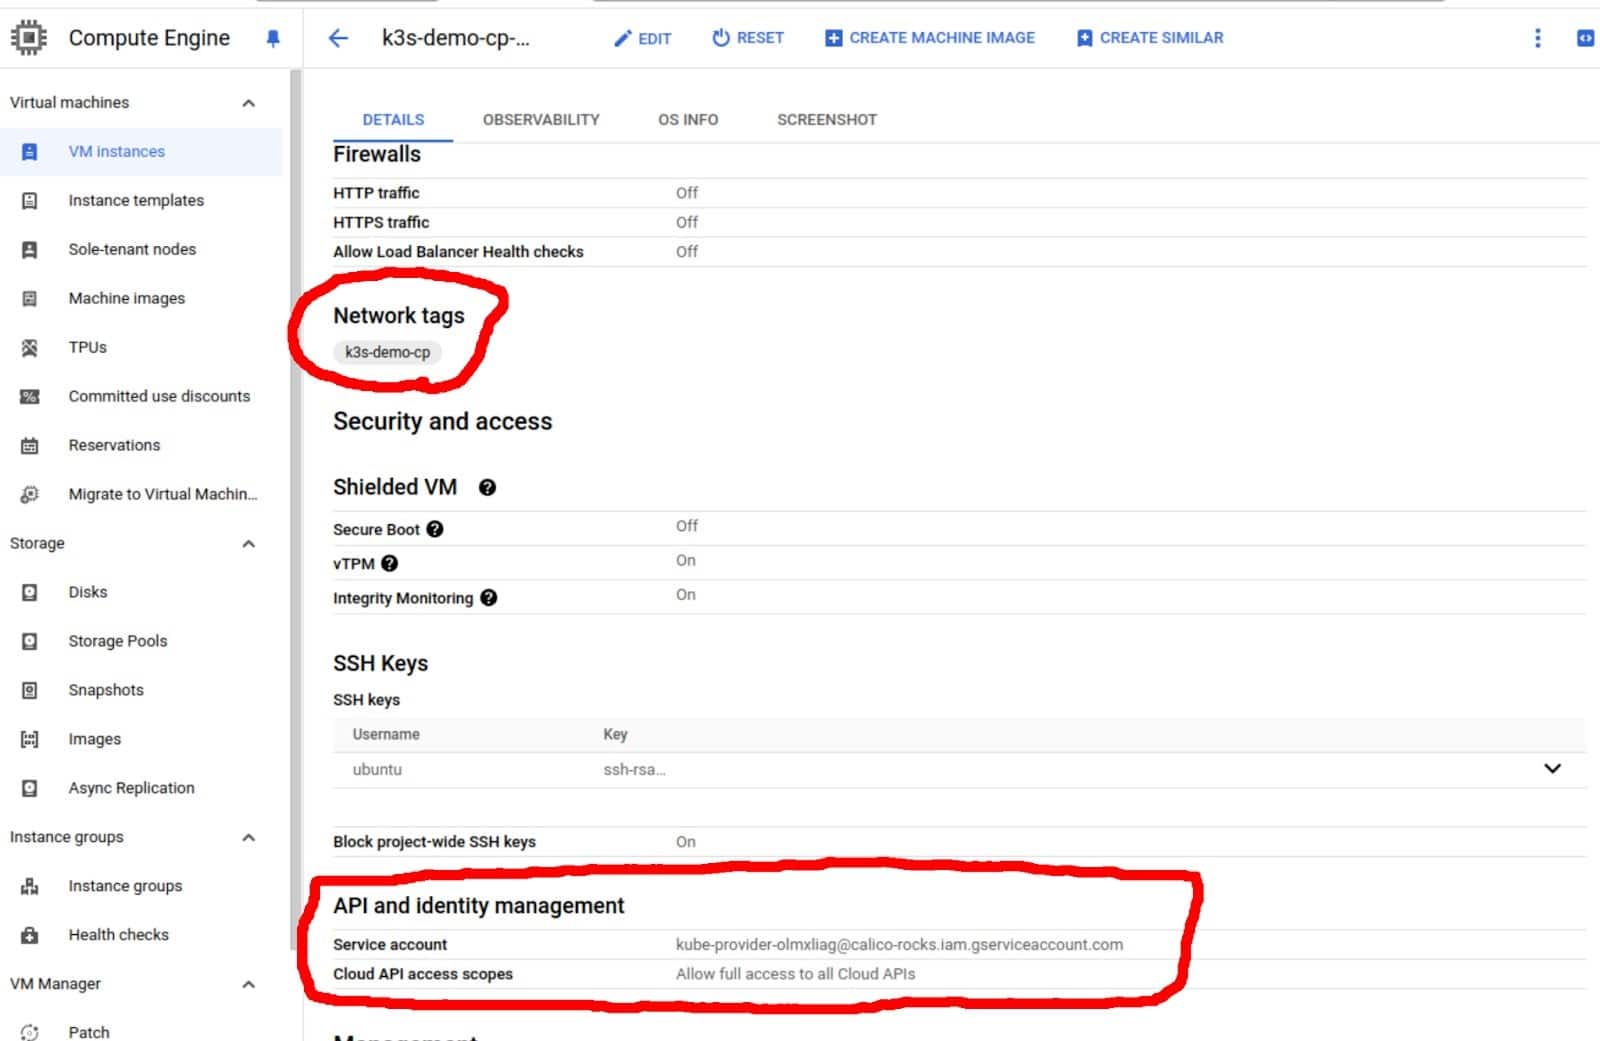
After creating the role and the IAM identity, head over to your VM instance in GCP and edit the resources. Here, make sure you assign a network tag (used to automate firewall rule deployment) to the instance, and in the API identity management, select the newly created service account.
At this point, we have configured everything necessary for the cloud provider controller to issue resource creation requests via GCP APIs.
Preparing kubelet
Before installing the cloud provider integration, we must take a few steps to prepare our cluster. First, we need to run kubelet with the appropriate argument.
These arguments are:
--kubelet-arg=cloud-provider=external If you have configured Kubernetes before, “cloud-provider=external” will look familiar. Prior to version v1.29, we could adjust the cloud-provider argument to “gcp,aws, …” to use the in-tree cloud provider. However, using this with recent versions will result in errors and, in some cases, prevent the Kubernetes process from running. Currently with the new releases the only valid option for cloud-provider is going to be “external”.
Note: Keep in mind that if you bootstrap the cloud provider integration your nodes will have a taint that will not be lifted until the provider completely initializes. You can read about this here.
K3s default provider
By default, K3s is shipped with an internal cloud-controller component, which must be disabled before we can use the cloud-specific integration. This can be accomplished by appending the following argument to K3s command.
--disable-cloud-controllerNote: You can accomplish both steps in a fresh install using your K3s installation command. Here is an example.
If you are following the blog example and you have disabled the provider in your Terraform, use the following command to enable the external provider:
sed -i '/^$/d' /etc/systemd/system/k3s.service
echo -e "\t'--kubelet-arg=cloud-provider=external' \\" | sudo tee -a /etc/systemd/system/k3s.service
echo -e "\t'--disable-cloud-controller'" | sudo tee -a /etc/systemd/system/k3s.service
Use the following commands to reload the service and restart the K3s server:
sudo systemctl daemon-reload
sudo systemctl restart k3s
GCP cloud provider configs
GCP cloud provider can be configured using a config file. This file instructs the provider on how to interact with your cloud resources and where to generate the necessary resources. A comprehensive list of options can be found here.
The following example shows the minimum required bits to run the controller:
[Global]
project-id=<YOUR-GCP-PROJECT-ID>
network-name=<YOUR-VPC-NAME>
node-tags=<YOUR-INSTANCE-NETWORK-TAG> We assigned this in GCP permissions step
In the test environment that you created using the “demo-cluster” projects, there is already a generated config file called “cloud.config” in the “/tmp/” directory.
Use the following command to create the necessary options for the provider:
kubectl create cm -n kube-system cloud-config --from-file=/tmp/cloud.configCloud controller daemonset
Now that we have prepared all the necessary configs and permissions, it’s time to deploy the cloud controller. First download the daemonset manifest from here and open it in your favorite text editor.
Note: If you are using the demo environment, there is a daemonset template file called “cloud-controller.yaml” already generated for you in your control plane’s “tmp” folder.
Cloud controller config
In the default manifest that we downloaded in the previous section, GCP cloud provider configurations are mounted as files from the host. While this approach is a great way to load your configuration for this blog post, we are going to use the config map that we created on the previous step.
Simply remove the following lines of code from the template
volumeMounts:

        - mountPath: /etc/kubernetes/cloud.config

          name: cloudconfig

          readOnly: true

      hostNetwork: true

      priorityClassName: system-cluster-critical

      volumes:

      - hostPath:

          path: /etc/kubernetes/cloud.config

          type: ""

        name: cloudconfig
Now that these lines are removed, add the following place:
volumeMounts:

        - mountPath: /etc/kubernetes/cloud.config

          name: cloudconfig

          readOnly: true

      hostNetwork: true

      priorityClassName: system-cluster-critical

      volumes:

      - hostPath:

          path: /etc/kubernetes/cloud.config

          type: ""

        name: cloudconfig
This change allows us to use the configmap as a file inside the controller container.
Image Version
We need to change the image of our deployment. Each image corresponds to a version of Kubernetes, and we can verify that from the repository’s release page.
Note: A list of available image tags can be found here.
Change the image from:
image: k8scloudprovidergcp/cloud-controller-manager:latest… to:
image: registry.k8s.io/cloud-provider-gcp/cloud-controller-manager:v27.1.6We will use v27.1.6 since our K3s test environment is the most compatible version with our Kubernetes environment.
The following image illustrates the relationship between the cloud manager and Kubernetes versions.

Configuring Cloud Controller Manager binary
Cloud controller manager binary accepts many arguments and parameters that change its behavior regarding the underlying environment.
For example, the demo-cluster I provided with this article is configured with Calico CNI, which provides networking and security for the cluster. In this setup, Calico is configured to provide an IP address to the pod.
Back to our manifest, find the following:
       # ko puts it somewhere else... command: ['/usr/local/bin/cloud-controller-manager']
       args: [] # args must be replaced by tooling
… and change it to:
command:
       - /cloud-controller-manager
       - --cloud-provider=gce
       - --leader-elect=true
       - --use-service-account-credentials
       - --allocate-node-cidrs=true
       - --configure-cloud-routes=false
       - --cidr-allocator-type=CloudAllocator
Let’s quickly go over some important changes in the previous command and the thought process behind them.
` — cloud-provider=gce` tells the manager that we are using the Google Cloud infrastructure.
` — use-service-account-credentials` is used since our VMs have the necessary permission via the service account that is assigned to them (this step happened in the Terraform here).
` — controllers=*,-nodeipam` is used to disable the IPAM since Calico Open Source (CNI bundled in the demo) is used to assign IP addresses in our environment. This allows us to expand our cluster by using independent private IPs that are not part of the VPC, which provides flexibility beyond what is possible with the default provider IPs circumventing any IP exhaustion issues in the future.
`—cloud-config=/etc/cloud-config/cloud.config` is the configuration file that helps the manager determine where to deploy the resources.
If you would like to learn about the other options used in the command, click here.
If you are following up using the demo-cluster environment, a working copy is provided in the tmp folder.
kubectl create -f /tmp/cloud-controller.yamlWait for the cloud provider pod to come up.
kubectl get pod -n kube-systemCreate a load balancer service
Now that we have configured everything it is finally time to create a service.
Use the following command to create a load balancer service:
kubectl create -f -<<EOF
apiVersion: v1
kind: Service
metadata:
 name: example-service
spec:
 selector:
   app: example
 ports:
   - port: 8765
     targetPort: 9376
 type: LoadBalancer
EOF
At this point, your service should acquire an IP address from the provider. 🎉
Troubleshooting
Although this blog post is designed to provide the impression that everything will function seamlessly, in real-world scenarios, you may encounter various challenges, such as changes in permissions or updates to components that may not behave as expected.
The best place to troubleshoot cloud-provider integration issues is the logs. You can do this by running the following command:
kubectl logs -n kube-system ds/cloud-controller-managerFor example, if you forgot to disable K3s internal cloud-controller component you will see the following error in your pod:
I0906 17:14:08.469610       1 serving.go:348] Generated self-signed cert in-memory

I0906 17:14:09.062781       1 serving.go:348] Generated self-signed cert in-memory

W0906 17:14:09.062820       1 client_config.go:618] Neither --kubeconfig nor --master was specified.  Using the inClusterConfig.  This might not work.

failed to create listener: failed to listen on 0.0.0.0:10258: listen tcp 0.0.0.0:10258: bind: address already in use

Error: failed to create listener: failed to listen on 0.0.0.0:10258: listen tcp 0.0.0.0:10258: bind: address already in use
If you are missing a GCP permission, you will see something similar to the following:
E0906 17:24:43.925274 1 gce_loadbalancer_external.go:140] ensureExternalLoadBalancer(aaaaaaaaaaaaaaaaaaaaaaaaa(default/example-service)): Failed to release static IP 34.68.226.31 in region us-central1: googleapi: Error 403: Required 'compute.addresses.delete' permission for 'projects/calico-rocks/regions/us-central1/addresses/aaaaaaaaaaaaaaaaaaaaaaaa', forbidden.Clean up
Since cloud resources are invoiced by the minute, we have to clean up our environment as soon as possible. To do this, first make sure you have removed all the “loadbalancer” services from your Kubernetes cluster. Then, log out of the SSH box and issue the following command:
terraform destroyIf you don’t clean up your services, you may see an error similar to the following:
module.cluster-a.google_tags_tag_key.tag_key: Still destroying... [id=tagKeys/281480681984856, 10s elapsed]

module.cluster-a.google_tags_tag_key.tag_key: Destruction complete after 10s

╷

│ Error: Error waiting for Deleting Network: The network resource 'projects/calico-rocks/global/networks/k3s-demo-olmxliag' is already being used by 'projects/calico-rocks/global/firewalls/k8s-ef18857c633faeda-node-http-hc'

│

│
In such a case, you have to manually delete the resources from your Google Cloud account and re-run the Terraform clean-up step.
Conclusion
Kubernetes is a vibrant project and with each release it offers more flexibility and features. While creating a cluster nowadays is easier than ever, it is important to keep an eye on the Kubernetes blog to keep yourself updated with the latest Kubernetes news.
This blog post can be used to integrate out-of-tree providers in GCP. However, the same procedure can be used for other providers such as AWS, Azure, Alibaba, IBM, etc.